Appetizers

Portobello Fries w/ Basil Aioli

I first had these fries years ago at the well-known Italian restaurant, Bottega Louie. And ever since, I’ve wanted to find a way to replicate them. I think this recipe is pretty close to what I had (or dare I say better? haha). Light and crispy, “meaty” but perfectly tender, and it’s a veritable explosion of umami! I’d eat these fries over potato fries any day!   

IMG_4005.JPG

 Recipe:

  1. Basil Aioli: In a food processor, combine 0.5 oz fresh basil (about ¼ cup, packed), 2 garlic cloves, 1 tsp lemon juice, 2 tbsp extra virgin olive oil. Fold in ½ cup mayonnaise. Set bowl aside in fridge (covered).

  2. Cut 3-4 large Portobello mushrooms (stems removed) into ¾” slices. In a large bowl, add in 3 cups whole milk and soak the sliced mushrooms for 5-10 min.

  3. In a separate bowl, add in 2 cups Wondra flour (a very finely ground all-purpose flour) (Note: you can substitute with Mochiko rice or tapioca flour). I use this flour specifically to make the fries super flaky, light, and less oily!

  4. Working in batches, transfer the sliced mushrooms into the flour and roll around to coat completely. Transfer to a plate.

  5. Heat vegetable oil in a pot to 350°F (enough to deep fry). Working in batches, deep fry mushroom slices for 4-6 minutes (or until golden brown). Note: Avoid adding too many slices in at once, because it’ll drop the oil temp too quickly and your subsequent fry will yield oilier fries (and take longer to cook). Transfer to a paper towel to dry.

  6. Transfer all the portobello fries to a mixing bowl and toss with a handful of chopped parsley (about 1/2 cup), 1-2 tsp seasoning salt (to taste), and ¼ cup parmesan cheese.

  7. Enjoy immediately with a side of basil aioli.  

Bulgogi Kimbap/Gimbap (김밥)

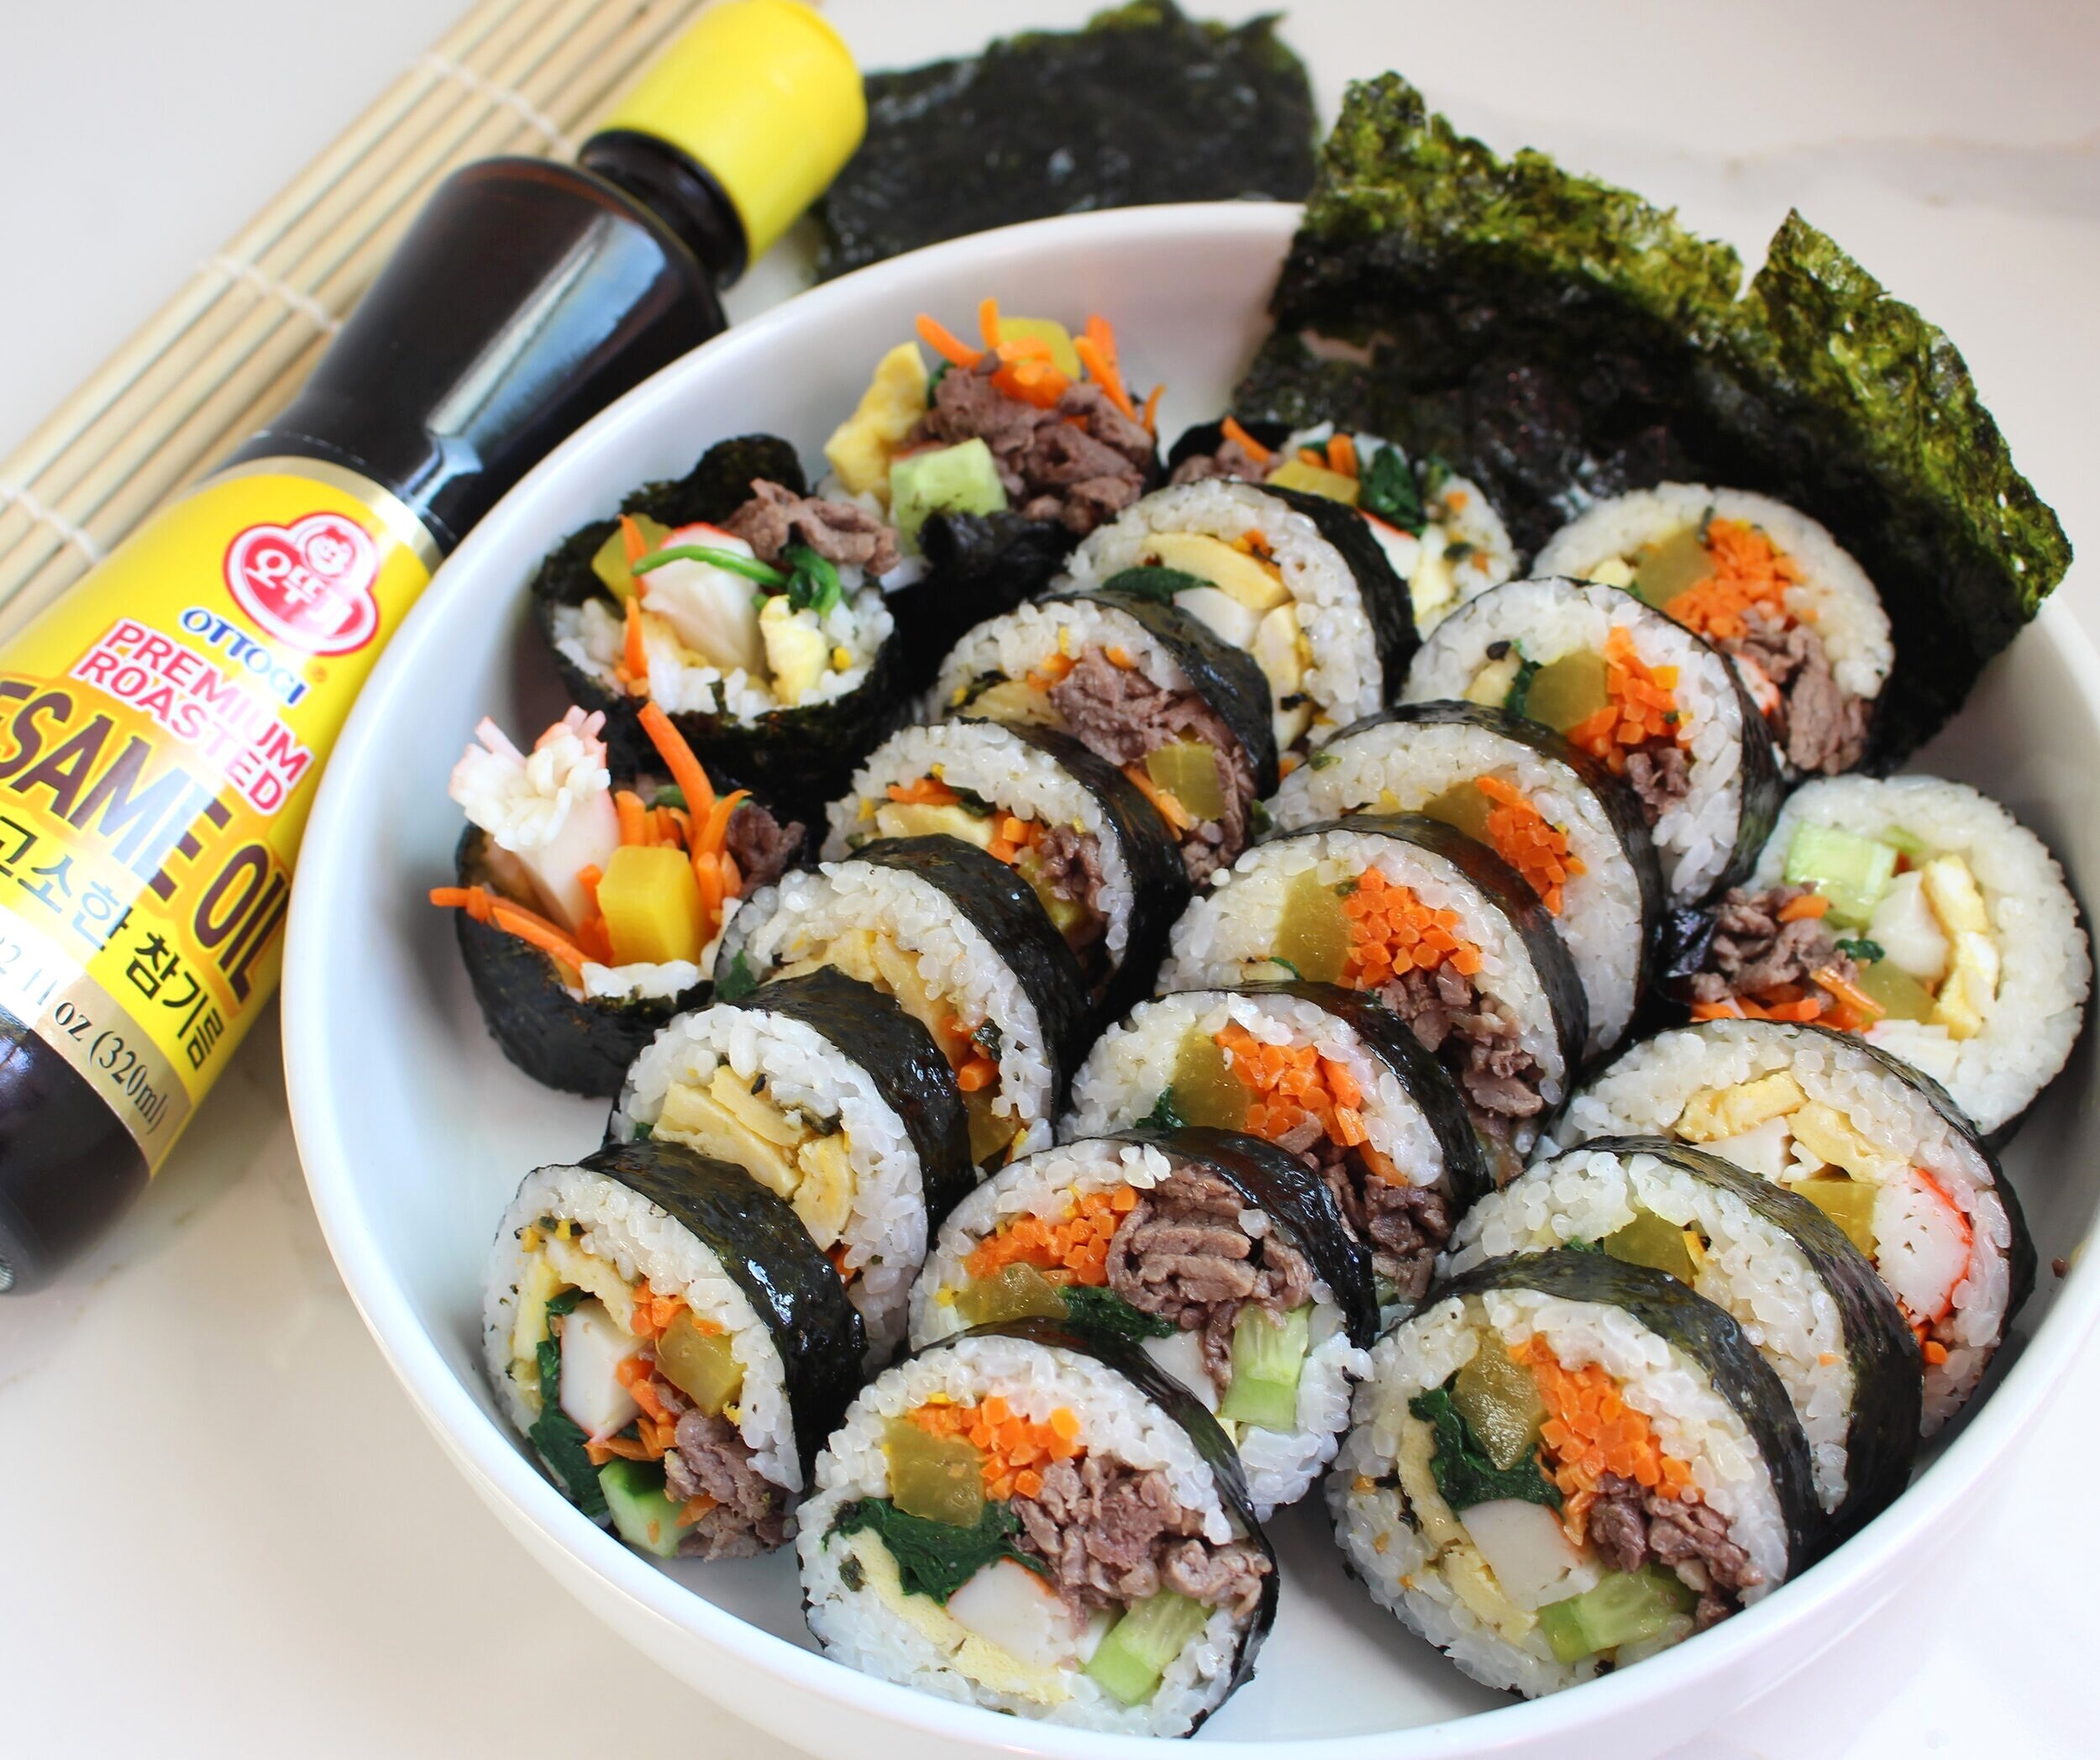
This colorful Korean staple is perfect for spring or summer picnics or enjoyed on-the-go, and it’s packed full of a variety of ingredients! While prepping all the ingredients, you’ll likely smell the delicious nutty aroma of roasted sesame oil, which I add to many of the components and also at the end to coat each roll (for that extra shine and aroma)! I chose to use Ribeye roll bulgogi, egg, carrots, imitation crab, spinach, danmuji, and cucumbers, but you can use your imagination for your own ingredients! (PSA: I learned from my Korean friends not to call this sushi! It’s like referring to a Greek gyro as a Mexican burrito. Oops!).  

IMG_3097 (2).JPG

Ottogi Roasted Sesame Oil: Voted as the top sesame oil in America’s Test Kitchen, this sesame oil has a beautiful deep golden color and a temptingly nutty aroma. I use it most often as a finishing oil, but I also add it to many marinades and to occasionally stir-fry as well. Just 1-2 teaspoons go a long way in imparting a full-bodied, nutty aroma! Great to have on hand in any pantry. It can be purchased at most Asian supermarkets or online on Amazon!

IMG_3077.JPG

Assembly:

  1. Place one seaweed sheet (shiny side down) onto a bamboo mat roller.

  2. Place about ½ cup seasoned rice or just enough to thinly spread over the bottom 2/3 of your seaweed (leave about 2” space up at the top).

  3. Sprinkle on some furikake rice seasoning (I used Ottogi’s Rice Friend Vegetable Flavor) (optional).

  4. Staying in the middle of your rice, horizontally place all ingredients in one by one, making sure not to add excessive amounts (will make it difficult to properly wrap; don’t follow my mistake, haha!).

  5. With your thumbs as support underneath the bamboo roller, use the rest of your fingers to firmly compact the fillings and then begin to roll forward/upward.

  6. Once the bottom end of the seaweed has reached the end of your rice line, light squeeze the roller to further compact the ingredients.

  7. Unroll the bamboo mat, place a little sesame oil on the exposed seaweed with your finger, and complete the roll

  8. Before serving, to create extra shine and flavor, coat the entire surface of the kimbap with toasted sesame oil (with a brush or your fingers). Carefully rub sesame oil over your knife and slice about ½” pieces. Serve and enjoy immediately!

IMG_3105 (2).JPG

Soy Garlic Fried Chicken (간장마늘 양념치킨)

This chicken is covered in an incredibly crispy shell (from the potato starch and the double-fry) and is super tender & juicy on the inside! It’s sweet, sticky, tangy, and super addicting! Add some gochujang if you like spice! If you’re tired of only watching people eat this in KDramas (haha) or just love fried chicken, give this recipe a try!

IMG_2969.JPG

Recipe:

  1. Season 2 lb of chicken (wings/drummettes/drumsticks/tenders) with ½ tsp sesame oil, 1 tsp ginger (grated or minced), 1 tsp garlic salt, and ½ tsp white pepper.

  2. In a large Ziploc bag or container, add in ½ cup panko breadcrumbs and 1 cup potato starch. Shake to combine. In small batches, drop the chicken into the bag/container and shake until well coated.  

  3. In a deep skillet, pot, or deep fryer, heat about 4 cups of vegetable oil to 325F (or enough to achieve about 2” depth; make sure the oil doesn’t rise more than halfway up the cooking vessel to avoid oil overflow). Deep fry chicken for approx. 7-8 minutes (wings), 9-10 minutes (drumsticks), and/or 4-5 minutes (boneless chicken tenders) [Note: cooking times vary for each cut of chicken and stove]. Promptly remove from fryer and place on a wire cooling rack (over a baking pan) or paper towel-lined plate to drain excess oil. Set aside for about 10 min.

  4. Bring oil up to 375F. Deep fry chicken a second time for about 30 seconds-1 minute (should be golden brown). Drain again on cooling rack or paper towel. Transfer to a large metal mixing bowl.

  5. Glaze: In a skillet over low/medium heat, add in 2 tbsp vegetable oil and heat 8 cloves garlic (minced) for about 2-3 min. Add in ¼ cup (or 4 tbsp) sweet soy sauce, ¼ cup (or 4 tbsp) honey, ½ tbsp sesame oil, 3 tbsp rice wine vinegar, and 1-2 tbsp water (optional: add in 1 tbsp gochujang, if you like spicy).  Bring to a simmer and continuously stir until sauce has slightly thickened and has a shiny glaze (about 2-4 min). [Note: Make sure to not cook it too long or it will over-thicken and will be difficult to coat the chicken]

  6. Immediately drizzle the sauce over the chicken and toss to coat.

  7. Sprinkle on white sesame seeds and chives (optional). Serve with pickled daikon radishes (cubed).

IMG_2966.JPG

Shrimp Pomelo Salad (Yum Som-O; ยำส้มโอ)

Pomelos are the larger & sweeter cousins of grapefruits, and they’re less bitter & tangy as well. This bright salad combines the sweet pomelo fruit with succulent chilled shrimp, fragrant herbs (mint, cilantro, Thai basil), toasted coconut, fried shallots, and roasted peanuts. My variation of this classic Thai salad adds in some Vietnamese influences with the pickled carrots, turnips, and lotus roots, for some additional texture and brightness!

IMG_2852.jpg

Day Before:

  1. Prep (Pomelo): Harvest the flesh from 2 medium-sized pomelos (should yield about 3 cups of flesh). How to break down a pomelo – Cut off the top ¾” of the pomelo (near the stem). With a sharp knife, score the skin/rind into 6-8 segments, making incisions about ½” deep and going length-wise to the opposite end of the pomelo. With your fingers, gently insert your thumbs in the center (where the stem was) and peel apart. Pull away the pith/membrane and harvest the pomelo flesh. Try to keep flesh as bite-sized chunks. Refrigerate in a bowl covered for at least 1 hour.

  2. Prep (pickled veggies): In a jar, mix together 4 cups water, 1 tbsp salt, 3 tbsp sugar, and ½ cup rice vinegar. Peel and julienne 1/3 cup carrots and 1/3 cup daikon radish. Place in a jar and submerge with pickling liquid. Refrigerate overnight.

  3. Prep (lotus root; optional): For the lotus root, you can buy it pickled at your local Asian store. If you’re working with fresh lotus root, peel the skin, cut off the ends, and cut into ½” slices. Soak in a bowl of 3 cups water w/ added 1 tsp rice vinegar for 5 min (to help remove astringent taste). In a pot, combine 3 cups water, ½ cup sugar, 1 tsp salt, and ½ cup rice vinegar. Boil for 10 min. Transfer to a container/jar and fill the jaw with the liquid you cooked it with. Refrigerate overnight.

IMG_2828.jpg

 Day Of:

  1. Prep (shrimp): Boil ½ pound of shrimp (peeled, deveined) for about 1- 1½ min and shock in ice cold water. Drain and set aside in fridge.

  2. Prep (herbs): Coarsely chop ¼ cup mint, ¼ cup cilantro/coriander, and ¼ cup Thai basil.

  3. Prep (mix-in/garnish): Toast ½ cup shredded unsweetened coconut in a skillet until crisp & golden brown (about 4-5 min over medium heat). Crush 2 tbsp roasted peanuts with a mortar & pestle (or coarsely chop with a knife). Set aside ¼ cup fried shallots (can be purchased premade at Asian stores)

  4. Dressing: Combine 2 cloves of garlic (minced), 1 Thai chili (finely chopped), 2 tbsp lime juice, 2 tsp fish sauce, and 1 tbsp palm sugar (or white sugar). Mix thoroughly w/ a whisk.

Combine all ingredients in a large mixing bowl, add dressing, and mix gently, making sure not to break apart too much of the pomelo flesh. Garnish with more herbs, fried shallots, roasted peanuts, and toasted coconut!

You can enjoy it as is, or serve it on top of a bed of chopped butter lettuce or your favorite spring mix.

IMG_2849.jpg

Hawaiian Garlic Shrimp

These succulent shrimp are covered in an extra garlicky, rich butter-based sauce, very reminiscent of those delicious bowls of shrimp from the local legendary food trucks in Hawaii! It’s packed full of flavor! And, it turns out that it’s very simple to make! No need to book a flight to Hawaii (haha); anyhow, we are all pretty grounded for the time-being due to travel restrictions. Can’t wait for things to slowly return back to normal! Really miss seeing all my  friends and family! Hope you are all safe and well!  

Warning: You just may need a swish of mouthwash after consuming this deliciousness! My go-to is ACT Total Care anticavity fluoride rinse (alcohol-free)!

CD739293-6091-4F56-86B3-4841C2DC6630.jpg

 Recipe:

  1. Prep: Clean and devein 1 pound of jumbo shrimp (shell off or on, whatever your preference; leaving shells on likely adds more flavor, but I deshelled them because I’m pretty lazy when I eat). Finely dice 15-20 large cloves of garlic. Finely dice 2 shallots.

  2. In a large resealable bag, place 3 tbsp all-purpose flour, 1 tbsp corn starch, 1 tsp paprika, 1 tsp onion powder, 1½ tsp sea salt, and 1 tsp black pepper in a large resealable bag. Shake to mix.

  3. Add shrimp into the bag and shake to evenly coat. Remove from bag and set aside.

  4. In a large skillet/pan over medium heat, melt 1 stick of unsalted butter (ie. ½ cup) and then add 1 tbsp olive oil. Once melted, add in diced garlic & shallots, 1 tsp chopped chili flakes, 1 tsp cajun seasoning, 1 tsp oyster sauce, ½ tsp sugar, 1 tbsp white wine (Pinot Grigio, Sauvignon Blanc, etc), and cook for 2-3 min (until garlic is lightly browned). Adjust sauce with ½ tsp chicken bouillon as needed. Remove garlic butter sauce from heat and set aside in a bowl.

  5. Add in additional 3 tbsp olive oil and once heated, add in the shrimp. Cook over medium high heat for 2-3 min each side.

  6. Pour in the garlic sauce and stir to coat. Garnish with green onion or chopped parsley, and add a squeeze of lemon!

  7. Serve with macaroni salad, fresh (or lightly sautéed) pineapple, and some white rice (jasmine).

Cream of Mushroom Soup

This is an adaptation of a recipe given to me by one of my amazing patients! The payoff for the extra time spent making it yourself is absolutely worth it! This comforting warm bowl of soup is super creamy, packed with umami from the natural flavor of mushrooms, and the fresh & dry herbs definitely add depth (compared to your canned soups)! I thought I’d switch it up with a play off of biscuits & gravy, so I paired the soup with some homemade cheddar biscuits.  

IMG_2699.jpg

Recipe:

1.       Prep: Mince 2-3 whole shallots (should yield about ¾ - 1 cup) and 4 cloves of garlic. Chop up about 2 tsp of fresh thyme leaves. Clean and then roughly chop about 2 pounds of your favorite mushrooms (any combination of baby bella/cremini, button, shiitake, etc). Note: Limit the use of stronger-flavored mushrooms to about a small handful (e.g. chanterelles, morels, shiitakes). In my recipe, I used about 45% brown baby bella/cremini, 45% white button, and 10% shiitake mushrooms.  

IMG_0509.jpg
IMG_0512.jpg

2.       In a pot or preferably a cast-iron dutch oven, add 2-3 tbsp olive oil and sauté minced shallots and garlic for about 2-3 minutes over medium high heat.

3.       Add in 4 tbsp butter, your chopped mushrooms, and 2 tsp chopped thyme. Continue to cook until browned and most of the water has been released (about 5-7 min). De-glaze with about 1/3 cup dry white (Pinot Grigio or Sauvignon Blanc) or red wine (Pinot, Merlot, Marsala), and cook for another 3-4 minutes (optional step; omit if you prefer no alcohol). Remove a large spoonful of the sautéed mushrooms (for garnish).

4.       Sprinkle remaining mushroom mixture with about 4 tbsp all-purpose flour and cook for 2 minutes.

IMG_0514.jpg

5.       Add in ¾ tsp dried tarragon, 4 cups of chicken stock (or vegetable stock), ½ tbsp chicken bouillon (optional), and 1 tsp sea salt. Mix well and then bring to a boil. Reduce heat to medium low, cover, and allow to simmer for 10 minutes.

IMG_0515.jpg

6.       Turn off heat. With an immersion blender or using a standup blender/mixer (in batches), puree soup until it reaches a smooth consistency. Adjust desired thickness of soup with more stock or water if necessary. Alternatively, you can also skip this blending step entirely if you like.

7.       Stir in ¾ cup half & half (or heavy cream, if you desire more richness). Turn heat to medium and cook for additional 2 min. Add salt and ground black pepper to taste.

IMG_0516.jpg
IMG_0517.jpg

8.       Garnish with sautéed mushrooms, fresh thyme, and extra virgin olive oil. Enjoy with garlic bread, crackers, or cheddar biscuits!

Smoked Salmon Pizza

IMG_2347.jpg

This is a dish that can be served as breakfast, brunch, lunch, or even a light appetizer before dinner! Super easy to assemble and looks fancy (haha). The textural & temperature contrast and classic combination of ingredients make it super delicious. I’ve seen it on the menu of many restaurants for $50+ (crazy...) but you can easily make it at home for a fraction of the price! For this pizza, I used Ikura-grade gold pearl salmon roe from @therealtsarnicoulai (sustainably caught salmon) and nicely pre-trimmed and smoked @ducktrapriverofmaine Kendall Brook® salmon.

Recipe:

  1. Pizza Crust: Combine 1 cup AP flour, 1 envelope (2¼ tsp) pizza crust yeast, 1½ tsp sugar, ½ tsp salt in a large bowl. Add ½ cup warm water (around 110-120°F) and mix well until blended. If necessary, add enough flour to make a ball of dough that is pliable. Knead on a floured surface for 3-4 min. Roll the dough into a circle (or whatever desired shape). Place on a greased baking sheet (olive oil). Brush the dough with 2 tbsp of olive oil. Sprinkle ¼ cup of thinly sliced red onion over the top of the dough. Season with salt.

  2. Bake in oven at 425°F for 15 minutes (or until crust is slightly browned). Remove from oven and let cool for 5 min.

  3. Spread 2-3 tbsp softened cream cheese (or crème fraiche) over the top of pizza.

  4. Arrange thinly sliced smoked salmon over the top. Cut pizza into 4-6 slices. Sprinkle finely chopped chives over the top. Place a small spoonful of salmon caviar on each slice (optional). Squeeze some lemon juice over the top, add lemon zest, and serve immediately!

IMG_2312.jpg
IMG_2328.jpg

Fig, Prosciutto, and Mozzarella Flatbread w/ Avocado

IMG_2164.jpg

It’s fig season again! My parents recently delivered a recent harvest of fresh black mission figs from their yard, so I thought I’d make a savory sweet flatbread/pizza! This flatbread has an addicting combination of flavors: creamy mozzarella, sweet figs, salty prosciutto, peppery arugula, creamy avocado, and tangy balsamic – all on a simple homemade pizza crust! As usual, let's all take every reasonable effort to limit & prevent the spread of COVID-19 for our friends, family, and community! Stay well all! :)

Recipe:

  1. Flatbread/Pizza Crust: Combine 1 cup AP flour, 1 envelope Fleischmann’s Pizza Crust Yeast (2 ¼ tsp), 1½ tsp sugar, ½ tsp salt in a large bowl. Add ½ cup warm water (around 110-120ºF) and mix until well blended. Gradually add enough flour to make a ball of dough that is pliable but still a little sticky. Knead the dough on a floured surface until smooth and elastic (takes about 3-4 minutes). Add more flour as necessary. Roll out the dough into desired shape and thickness. Place on a greased baking sheet (olive oil). Fold edges to form a crust (if desired). Note: there’s no need to wait for the dough to rise if using pizza crust yeast; otherwise, cover dough and let rest for 30 minutes in a warm spot.

  2. Mince 3 cloves of garlic and mix with 2 tbsp olive oil. Use a brush to coat the pizza dough, making sure to apply liberally to the crust.

  3. Cut a few thick slices of mozzarella cheese and place/distribute them evenly on top of the dough.

  4. Cut 4-5 fresh figs (washed) into ¼” slices and distribute over the dough surface. Note: If it’s not fig season, you could always substitute with 1-2 tbsp fig jam.  

  5. Preheat oven to 425ºF. Bake on the lowest rack for 15-18 minutes (or until crust is browned and cheese is slightly browned & bubbly). Remove from oven and let cool for about 5 minutes.

  6. Immediately before serving, sprinkle arugula over the top and add a few slices of prosciutto and freshly sliced avocado.

  7. Garnish with sea salt flakes, balsamic vinegar, and olive oil. Add quartered figs if you want additional texture.

IMG_2195.jpg

Chinese Stir-Fried Tomato and Egg (番茄炒蛋)

I’m pretty sure this dish is made in every Chinese household, and I’ve seen variations of it in different cultures! It’s one of the simplest dishes to throw together in less than 10 minutes, and it only involves a small handful of common ingredients. Super tasty, perfect as a side dish with some rice, and packed full of protein and antioxidants! Hope you and your families are staying safe and healthy!

IMG_1797.jpg

Recipe:

  1. Prep: Crack and beat 4-5 eggs and add in 1 tbsp Shaoxing rice wine; season lightly with salt. Dice up 2 vine ripened tomatoes (you can peel them if you like; I like to leave it on). Finely dice 3 stalks of green onion.

  2. On high heat in a nonstick skillet, sauté diced green onion in about 2 tbsp of corn oil for about 1 min. Add in chopped tomatoes, approx. 2 tbsp ketchup, and 1-2 tsp sugar. Stir around for 1 min. Add in cornstarch/water mixture (1 tsp cornstarch dissolved in about 1 tbsp water) to thicken the sauce. Remove immediately from heat and set aside on a dish.

  3. Add a little more corn oil to coat bottom of skillet and add in the eggs. Stir gently with a spatula for about 45-60 seconds until the eggs are just beginning to set (still a bit runny). Add in tomato mixture and ½ tsp sesame oil and stir around for additional 1 min. Remove from heat.

  4. Taste and adjust accordingly with sugar, salt, or ketchup. Garnish with cilantro, green onion, and cherry tomatoes if desired.

    Note: cherry tomatoes should only be added for garnish; avoid using them for the stir fry due to the high skin to flesh ratio. Tomatoes on the vine, red beefsteak tomatoes, med/large heirloom tomatoes, and roma tomatoes can all be used. Avoid cherry and grape tomatoes.     

Bacon & Roasted Garlic Pan Fried Potatoes

Bacon & Roasted Garlic Pan Fried Potatoes – This was one of my favorite side dishes that my mom made for me growing up. I still love it to this day. I don’t know why, but I’ve always called them “Chinese French Fries,” even though there’s nothing particularly Chinese about it, haha! Maybe the addition of rice wine vinegar…? Anyway, I love how comforting and nostalgic food can be, playing on all the senses and reminding us of our cherished social ties – perfect in times like these of quarantine and social isolation. This dish only takes about 15-20 minutes to make and involves only a small handful of ingredients! The rice wine vinegar adds a perfectly light tang and sweetness to the crispy bacon and roasted garlic. Hits on all the main elements - salt, fat, acid, and heat!

IMG_1780.jpg

Recipe:

1. Prep: Batonnet 4-5 Yukon gold potatoes (washed & peeled) (cut into ¼” x ¼” x 2-2.5” sticks). Cut 4 strips of bacon into ¼” lardons. Thinly dice 2 stalks of green onion (width-wise). Peel one bulb of garlic, obtaining about 10-12 whole cloves. Lightly crush garlic cloves with a large knife/cleaver but leave intact.

IMG_1764.jpg
IMG_1762.jpg

2. In a skillet/pan, sauté the chopped bacon in 1 tbsp corn oil on high heat for about 1 min. Then, add in garlic cloves and continue to sauté for 1 more min.

IMG_1766.jpg

3. Add in chopped potatoes and cook on medium-high heat for 7-8 minutes (covered with lid), making sure to stir/toss occasionally. Note: Don’t worry if your garlic slightly browns. I personally love the slightly bitter and sweet taste it takes on.  

4. Season with garlic salt and pepper to taste, and add in about ½ tsp sugar to aid in caramelization.

5. Add in about 2 tbsp of rice wine vinegar and stir until all potatoes are glazed.

6. Remove from heat, plate, and enjoy immediately!      

IMG_1785.jpg

Roasted Cauliflower with Lemon Tahini, Mint, and Pomegranate

IMG_1725.jpg

Recently went to a Mediterranean restaurant and had this amazing appetizer, so I thought I’d try to recreate it at home! This roasted caramelized cauliflower is topped with a creamy lemon tahini sauce and garnished with the unexpectedly satisfying sweet crunch of pomegranate seeds. Super easy to make, and it’s a great side dish or appetizer!

Recipe:

Lemon Tahini Sauce:

  1. Combine together in a small mixing bowl 4 tbsp tahini, 1 clove of garlic (minced), 2 tbsp freshly squeezed lemon juice, 2 tsp extra virgin olive oil, a small pinch of ground cumin (optional), and pinch of salt & pepper. Whisk to combine into a creamy emulsion (or combine in a food processor).

  2. Mixture will likely be thick. Add up to 1 tbsp water incrementally to thin out the mixture until it has a thin hummus consistency. Taste, and adjust for salt and acid.

Roasted Cauliflower:

  1. Harvest florets from 1 head of cauliflower by peeling off leaves and cutting towards the core/stem (try to keep the florets in larger pieces for better roasting; otherwise, they will dry out before they properly caramelize). Toss florets in 2 tbsp olive oil, a pinch of paprika for color, and season with salt & pepper.

  2. Spread cauliflower florets on a sheet pan, making sure not to overcrowd them, and bake at 425°F until caramelized and fork tender (about 25-35 minutes; flipping them around the half-way point).

Assembly: Drizzle lemon tahini sauce, and garnish with parsley, mint, pomegranate seeds, and an extra twist of lemon! Consume immediately!

Caprese Dirt Salad 

IMG_1663.jpg

Caprese Dirt Salad - Finally back from my slight hiatus due to work! Jumped back into the kitchen and threw together this classic, simple, hard-to-beat Italian salad, made with only a handful of ingredients! The creamy burrata cheese, fragrant basil leaves, and sweet tomatoes are drizzled with tangy balsamic and quality olive oil. And, the “dirt” adds some texture, umami, and a little whimsy to the dish. I mean, when else can you say that you ate dirt (without injury)?! Gives new meaning to “farm-to-table” dining!

IMG_1659.jpg

Crumb Dirt Mixture:

  1. Mince 4-5 brown mushrooms. Transfer to a skillet with a few tbsp olive oil and cook on medium high heat until golden brown (and all liquid has evaporated)

  2. In a food processor, process 3 slices of dark rye bread until it becomes a fine crumb.

  3. Dump in rye crumbs into the sautéed mushrooms. Add olive oil and crisp up rye bread until dry.

  4. Add in 1 tbsp of ground almonds (or almond flour).

  5. Let cool to room temperature.

Salad Assembly:

  1. Assemble dollops of burrata cheese (8 oz) (or mozzarella) with sliced or cherry tomatoes.

  2. Dress with olive oil and a little balsamic vinegar. Season with Kosher salt and black pepper. Add in fresh sweet basil (chopped or leaves).

  3. Sprinkle dirt around the edges lightly, making sure not to cover the tomatoes entirely. And finish with a pile of dirt in the center. 

Fig, Prosciutto, and Taleggio Flatbread

A few more weeks before the end of fig season! I had a close encounter with a horde of bees while harvesting the fruit from the tree in the backyard, but it was well worth it! Hahah. Anyway, I paired the sweet black mission figs with some creamy Taleggio and salty prosciutto on top of a toasted wheat raisin pecan flatbread. It was finished with a light drizzle of manūka honey, although the figs were honestly already sweet enough! [Quick Note: If you’re not afraid of pungent cheeses, Taleggio is a delicious cow’s milk Italian soft cheese that melts extremely well. Trust me, it tastes a whole lot better than it smells! Haha]. Fig season’s almost over, so get them while they’re here! They’re a great source of potassium and calcium, as well as Vit A and E!

IMG_1488.jpg

Recipe:

  1. Thinly slice taleggio cheese and fresh figs.

  2. Add some olive oil onto a slice of your favorite bread, and toast in the oven by broiling for about 1-2 minutes on each side.

  3. Rub a halved piece of garlic onto the toasted bread, and then assemble the cheese on top, followed by fig slices. Return to oven and broil for an additional 3-5 minutes (or until cheese has melted and figs have begun to lightly caramelize).

  4. Remove from oven, and garnish with chives and honey. If you want more vegetables, I’d recommend topping it with some chopped radicchio!

Thai Chicken Coconut Soup (Tom Kha Gai) 🥥🌶

One of my favorite broth-based soups, especially on a cold winter day! Something about the blend of spicy, savory, sweet, and tart that is super comforting. Use of kaffir lime leaves and galangal make this soup extremely fragrant, and it’s definitely worth the trip to the Asian grocery store (if you don’t live nearby one)!

IMG_1063.jpg

Recipe:

  1. In a large pot, sauté one shallot (diced), one 1” piece of ginger (peeled, cut into 1/8” pieces), 1 stalk lemon grass (outer stalks removed and cut into 3-4” pieces), 8-10 kefir lime leaves, and one 1” piece of galangal root (cut into 1/8” pieces) for 1-2 min.

  2. Pour in 2.5 cups chicken broth and simmer on medium heat for 10 min.

  3. Add in 3 tbsp fish sauce and 1 tbsp light brown sugar. Stir gently.

  4. Add in mushrooms (chopped button, cremini, and shiitake) and chicken (1 lb boneless, skinless chicken, breast or thigh, sliced thin) and cook for 5-8 min or until chicken is cooked through/tender.

  5. Stir in 2 cans of coconut milk (full fat, unsweetened), 2 Thai chilies, and the juice of 2 limes.

  6. Simmer gently. Taste the soup and adjust with salt, lime, and chili paste as you desire! Add chicken broth if soup is too thick.

  7. Garnish with fresh lime wedges and cilantro.

Prawn Toast Sandwich w/ Herb Salad & Fish Sauce Vinaigrette

After trying the amazing shrimp toast sandwich at Jon & Vinny’s seafood-centric restaurant, Son of a Gun, I knew I had to try to replicate it at home! The combo of crispy, buttery bread and tender, savory shrimp is intensified with the creamy & spicy sriracha mayo and sweet hoisin sauce. Because it’s a pretty decadent dish (def avoid this if you’re counting calories, haha), the herb salad adds a much-needed brightness that ties everything together! It’s super addicting!

IMG_0924.jpg

Recipe:

  1. Combine 1 lb shrimp (peeled & de-veined), 1 egg white, 3 tsp soy sauce, 2 tsp sesame oil, 1 clove of garlic (minced), and approx. 1 tsp minced ginger in a food processor, and pulse until the shrimp mixture is incorporated into a nice paste.

  2. Cool in fridge for 10+ minutes (covered).

  3. Spread mixture evenly over each slice of white sandwich bread (crust removed).

  4. In a pan, heat vegetable or canola oil to 325°F, add in some butter, and shallow pan-fry each slice, starting shrimp-side down for 1-1½ min and flipping to the other side for about another 30s. Drain on paper towels and season with salt immediately.

  5. On each shrimp toast, add some sriracha mayo (can be made by combining 3 tbsp mayo, 1 tbsp sriracha, 1 tsp lime juice) and some hoisin sauce.

  6. Between the 2 slices of shrimp toast, place a generous portion of herb salad [cilantro, mint, watercress, Thai basil, green onion gently tossed in a fish sauce vinaigrette (½ cup fish sauce, ¼ cup water, 2 tbsp rice wine vinegar, 1/4 cup sugar, 1 clove minced garlic, juice of 1 lime)]. Enjoy immediately!

Roasted Butternut Squash Apple Soup w/ Fresh Goat Cheese

Here’s a warm and comforting fall-inspired soup recipe that is healthy & nutritious. Roasting the vegetables and adding some apples really brings out the delicate sweetness, and the goat cheese enriches the soup with creaminess and a slight tang that compliments well with the sweetness & spices. Great to start off any holiday dinner!

IMG_0984.jpg
IMG_3030.jpg

Recipe:

  1. Cut 1 large butternut squash (skin on), 2 Honey Crisp apples, and 1 large onion into 1” cubes.

  2. Place in a bowl and toss in olive oil, ½ tsp salt, and ¼ tsp black pepper.

  3. Spread onto a large baking sheet (lined with parchment or a silicone mat) and roast for 45 minutes at 400°F, tossing occasionally.

  4. When the vegetables are done, place into a blender with 3 cups chicken stock, ½ cup half&half, 1/3 cup crumbled goat cheese, ¼ tsp cinnamon, ¼ tsp ground clove, and ¼ tsp nutmeg. Blend until the soup is a smooth puree (ideally in a VitaMix, approximately 5-6 min)

    • Note: you may have to split this into 2 batches depending on the size of your blender). Add ½ cup water or chicken stock if the soup is too thick.

  5. Place the soup in a large pot and gently reheat (or in an Instant Pot – soup setting).

  6. Serve with pumpkin-spiced candied pecans (chopped) and goat cheese, or crème fraiche and chives.

IMG_0991.jpg

Mission Fig, Goat Cheese, and Prosciutto Crostini w/ Mānuka Honey


It’s fig season again, so I decided to harvest some fresh figs from the yard! Can’t go wrong with the classic combo of sweet black mission figs, salty prosciutto, and tangy goat cheese! I decided to add some peppery arugula for flavor contrast & color and topped it with some raw mānuka honey (although tbh the figs were already sweet enough!). There’s about one more month before the fleeting fig season is over, so get them while they’re still here! Figs are naturally rich in potassium & calcium and are a great source of Vit A and E!

IMG_0936.jpg

Basic Recipe:

  1. Slice 1 baguette into ½” diagonal slices, brush with a little olive oil, season w/ salt and pepper and heat in the oven for 10-15 minutes at 350°F. Let cool.

  2. Spread goat cheese onto each slice.

  3. Layer on prosciutto and arugula.

  4. Cut figs into cross-sections or thin slices and layer on top.

  5. Drizzle your favorite honey over the top and enjoy immediately!

Bacon Wrapped Dates Stuffed with Goat Cheese

A super simple and elegant appetizer that is sure to wow your guests! The sweet Medjool dates contrast very well with the creamy, tangy goat cheese and the smoky, crispy bacon. The earthiness and minty tones of thyme provide an extra aroma to this dish!

IMG_0740.jpg

Recipe:

  1. Slice Medjool dates lengthwise and remove pits.

  2. Add a small piece of goat cheese, lightly sprinkle on fresh thyme, and wrap with applewoood smoked bacon (strips should be pre-cut into thirds).

  3. Close tightly and secure with a toothpick.

  4. Bake at 375-400 degrees for 20-25 minutes (depending on bacon thickness), along with a few stems of fresh thyme on the baking sheet (to perfume the dates while baking).

    Note: For tighter, crispier versions, use thin-cut bacon. I used thick-cut bacon this time around - can’t decide which version I like more!!

Stuffed Chicken Wings w/ Sticky Chili and Ginger Marinade (aka “Wing Gyoza”)

What’s better than fried dumplings? How about replacing that dumpling skin with chicken skin?! 😏 These chicken wings are carefully deboned and then stuffed with a dumpling/gyoza mixture of ground pork, shiitake mushrooms, and shrimp! It’s finished off with a delicious sticky chili & ginger glaze! There’s something satisfying about biting straight into a wing without any worry of hitting a bone! Prep work takes time but it’s SO worth it!

IMG_1121.jpg

Recipe:

  1. Preheat oven to 400°F.

  2. De-boning: With a knife, carefully de-bone chicken wings by severing the joint & sliding the knife along the underside of the skin (the bones should cleanly come out after twisting at the joint).

  3. Marinade chicken for 10+ min. The sticky chili & ginger marinade I used is an Asian steakhouse marinade from @marionskitchen and is made from all-natural, gluten-free ingredients with no added MSG! 👌 It provides the perfect blend of heat and sweet, as well as a nice stickiness & char to your wings! Give it a try!! It’s delicious! Here’s a link: https://www.marionskitchen.com

  4. Filling: In a separate bowl, combine ½ lb ground pork, ¼ lb shrimp (coarsely chopped), 1 stem of green onion, 2 shiitake mushrooms (large, chopped), 1 tbsp ginger, 1 tbsp sesame oil, 2 tbsp soy sauce, and a splash of fish sauce. Mix thoroughly.

  5. Assembly: Carefully stuff each chicken wing with the filling mixture.

  6. Bake: Bake for 30 minutes at 400°F (or until cooked through), glazing with marinade every 10 minutes.

  7. Garnish with chives and roasted sesame seeds.

IMG_1112.jpg

Fresh Ahi Tuna Poke

Fresh Ahi Tuna Poke - a delicious and easy dish packed with tons of flavor and texture!

Recipe

  1. Cut 1 lb sashimi-grade ahi tuna into 1/2” cubes and place in a bowl.

  2. To the tuna, stir in 1/2 cup finely diced green onions, 2 tbsp minced shallots, 1 tbsp sesame seeds (lightly toasted), and 2 tbsp coarsely chopped macadamia nuts.

  3. In a separate bowl, combine 3 tbsp low-sodium soy sauce, 1-2 tsp sesame oil, 1 tbsp hoisin sauce, 1 tsp chile sauce (sriracha or sambal), and 2 tsp lemon juice (optional: 1/2 tsp minced ginger).

  4. Add sauce mixture to fish and gently toss.

  5. Cover and refrigerate for 2 hours before serving. Serve with fresh avocado and top with fried shallots or wontons!

IMG_9746.jpg