Taiwanese Sesame Cold Noodles (麻醬涼麵)

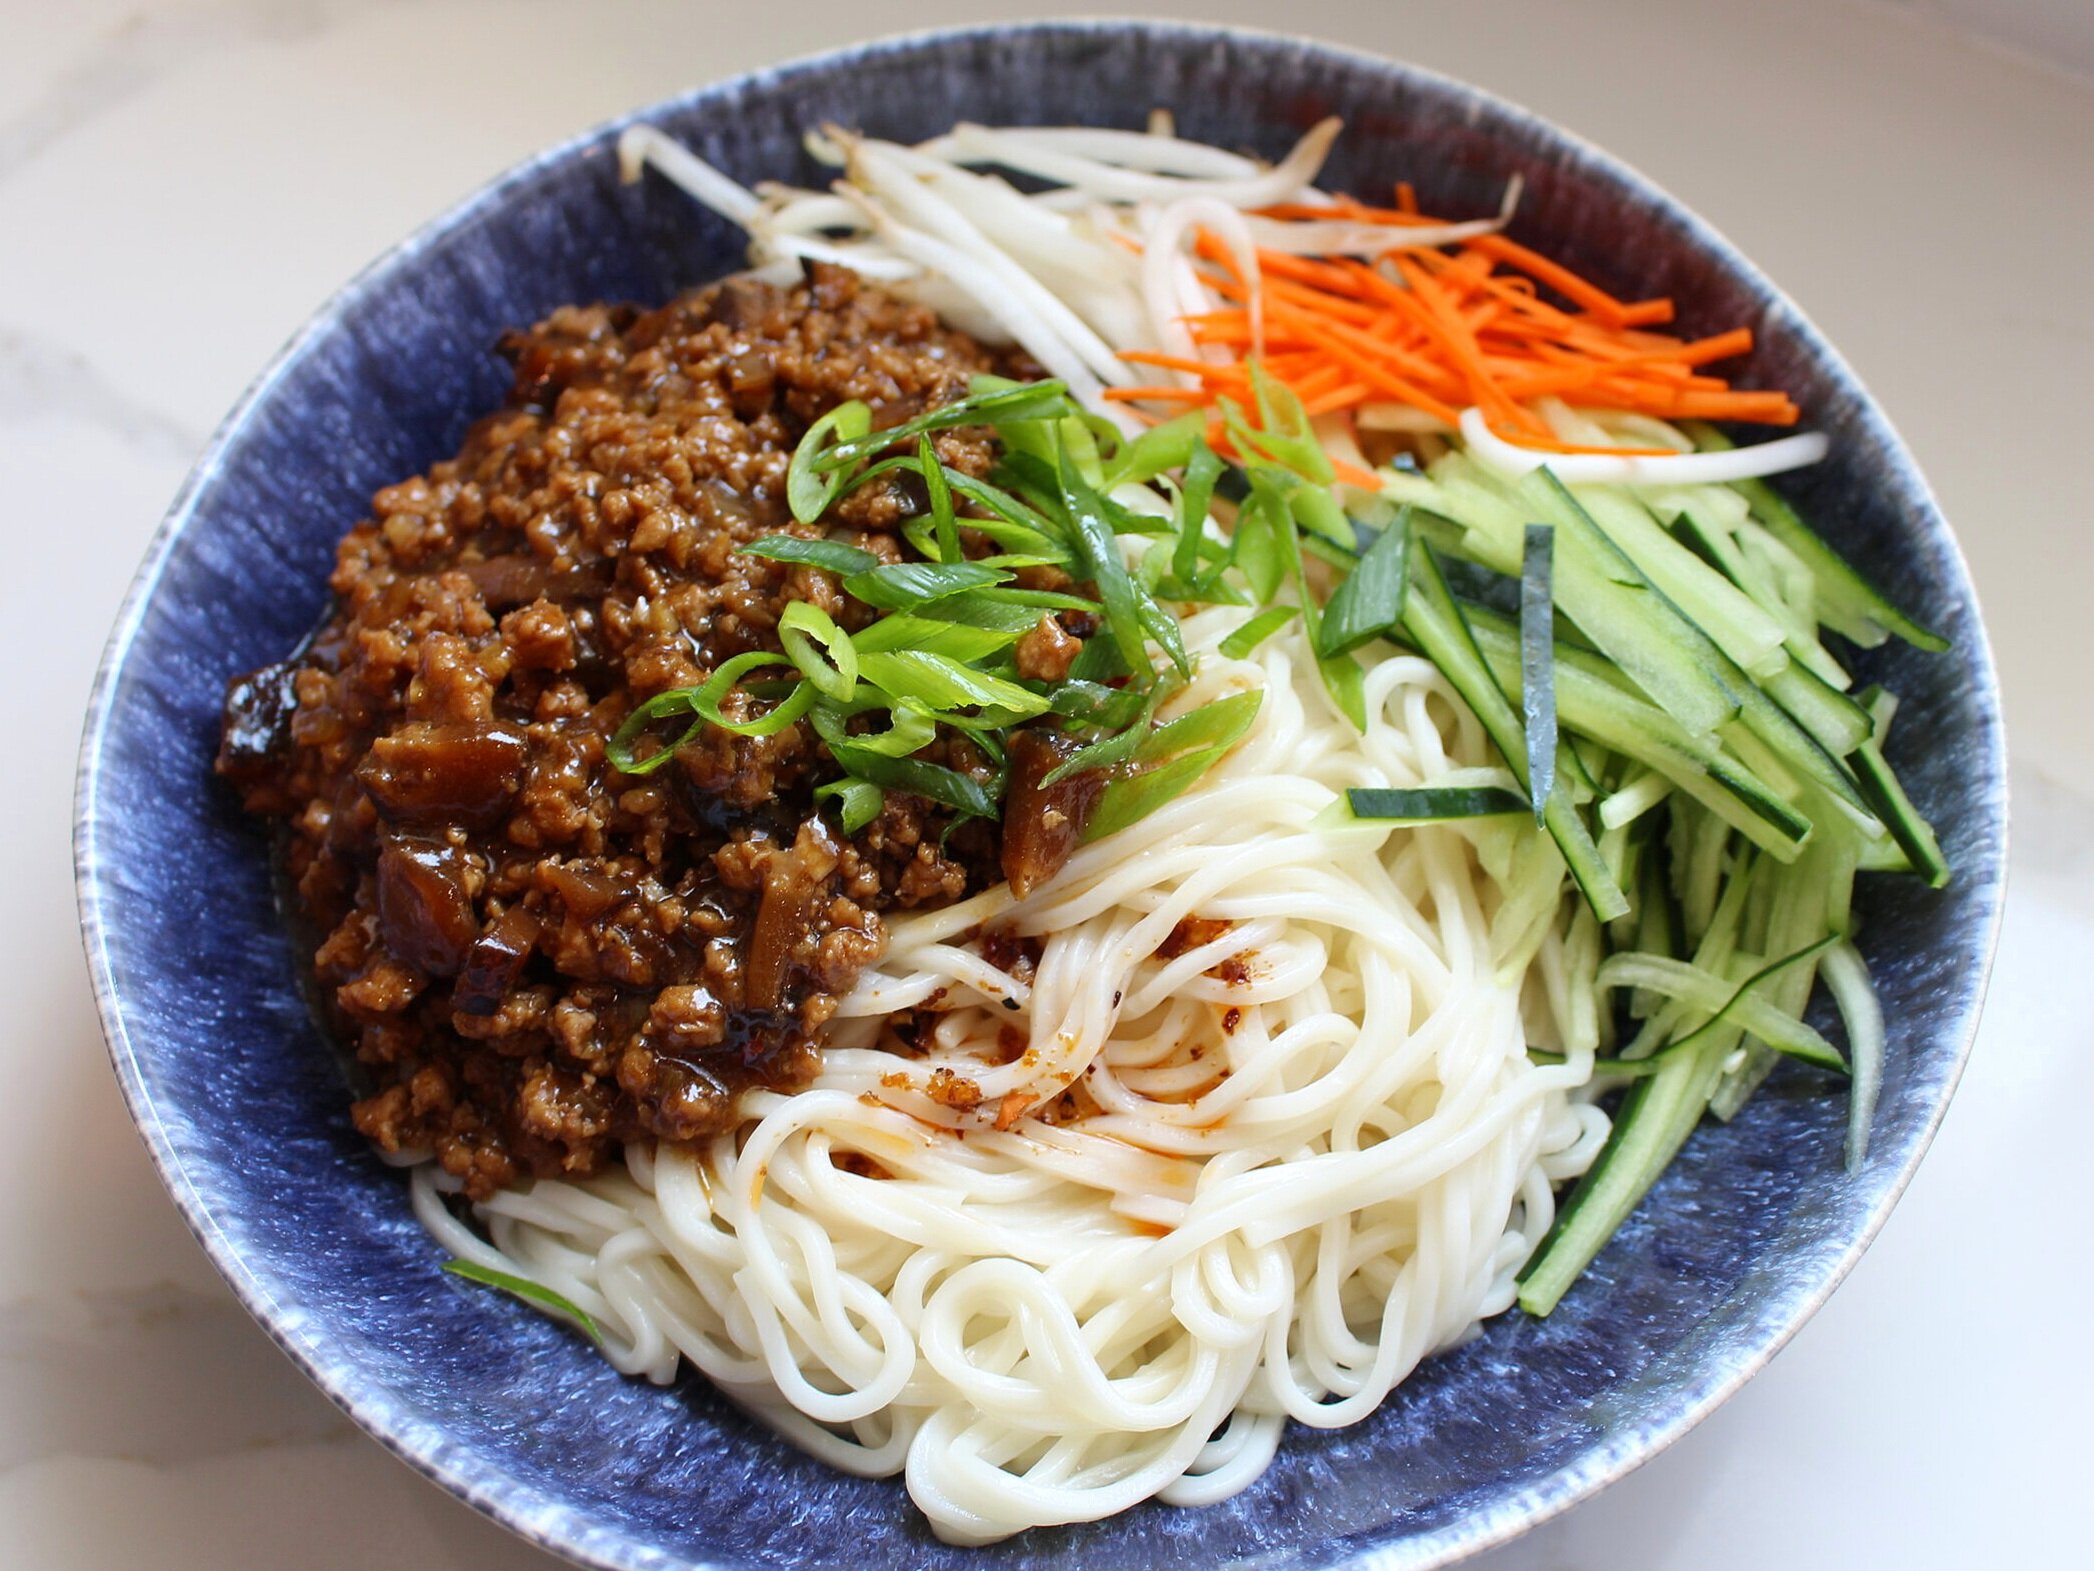
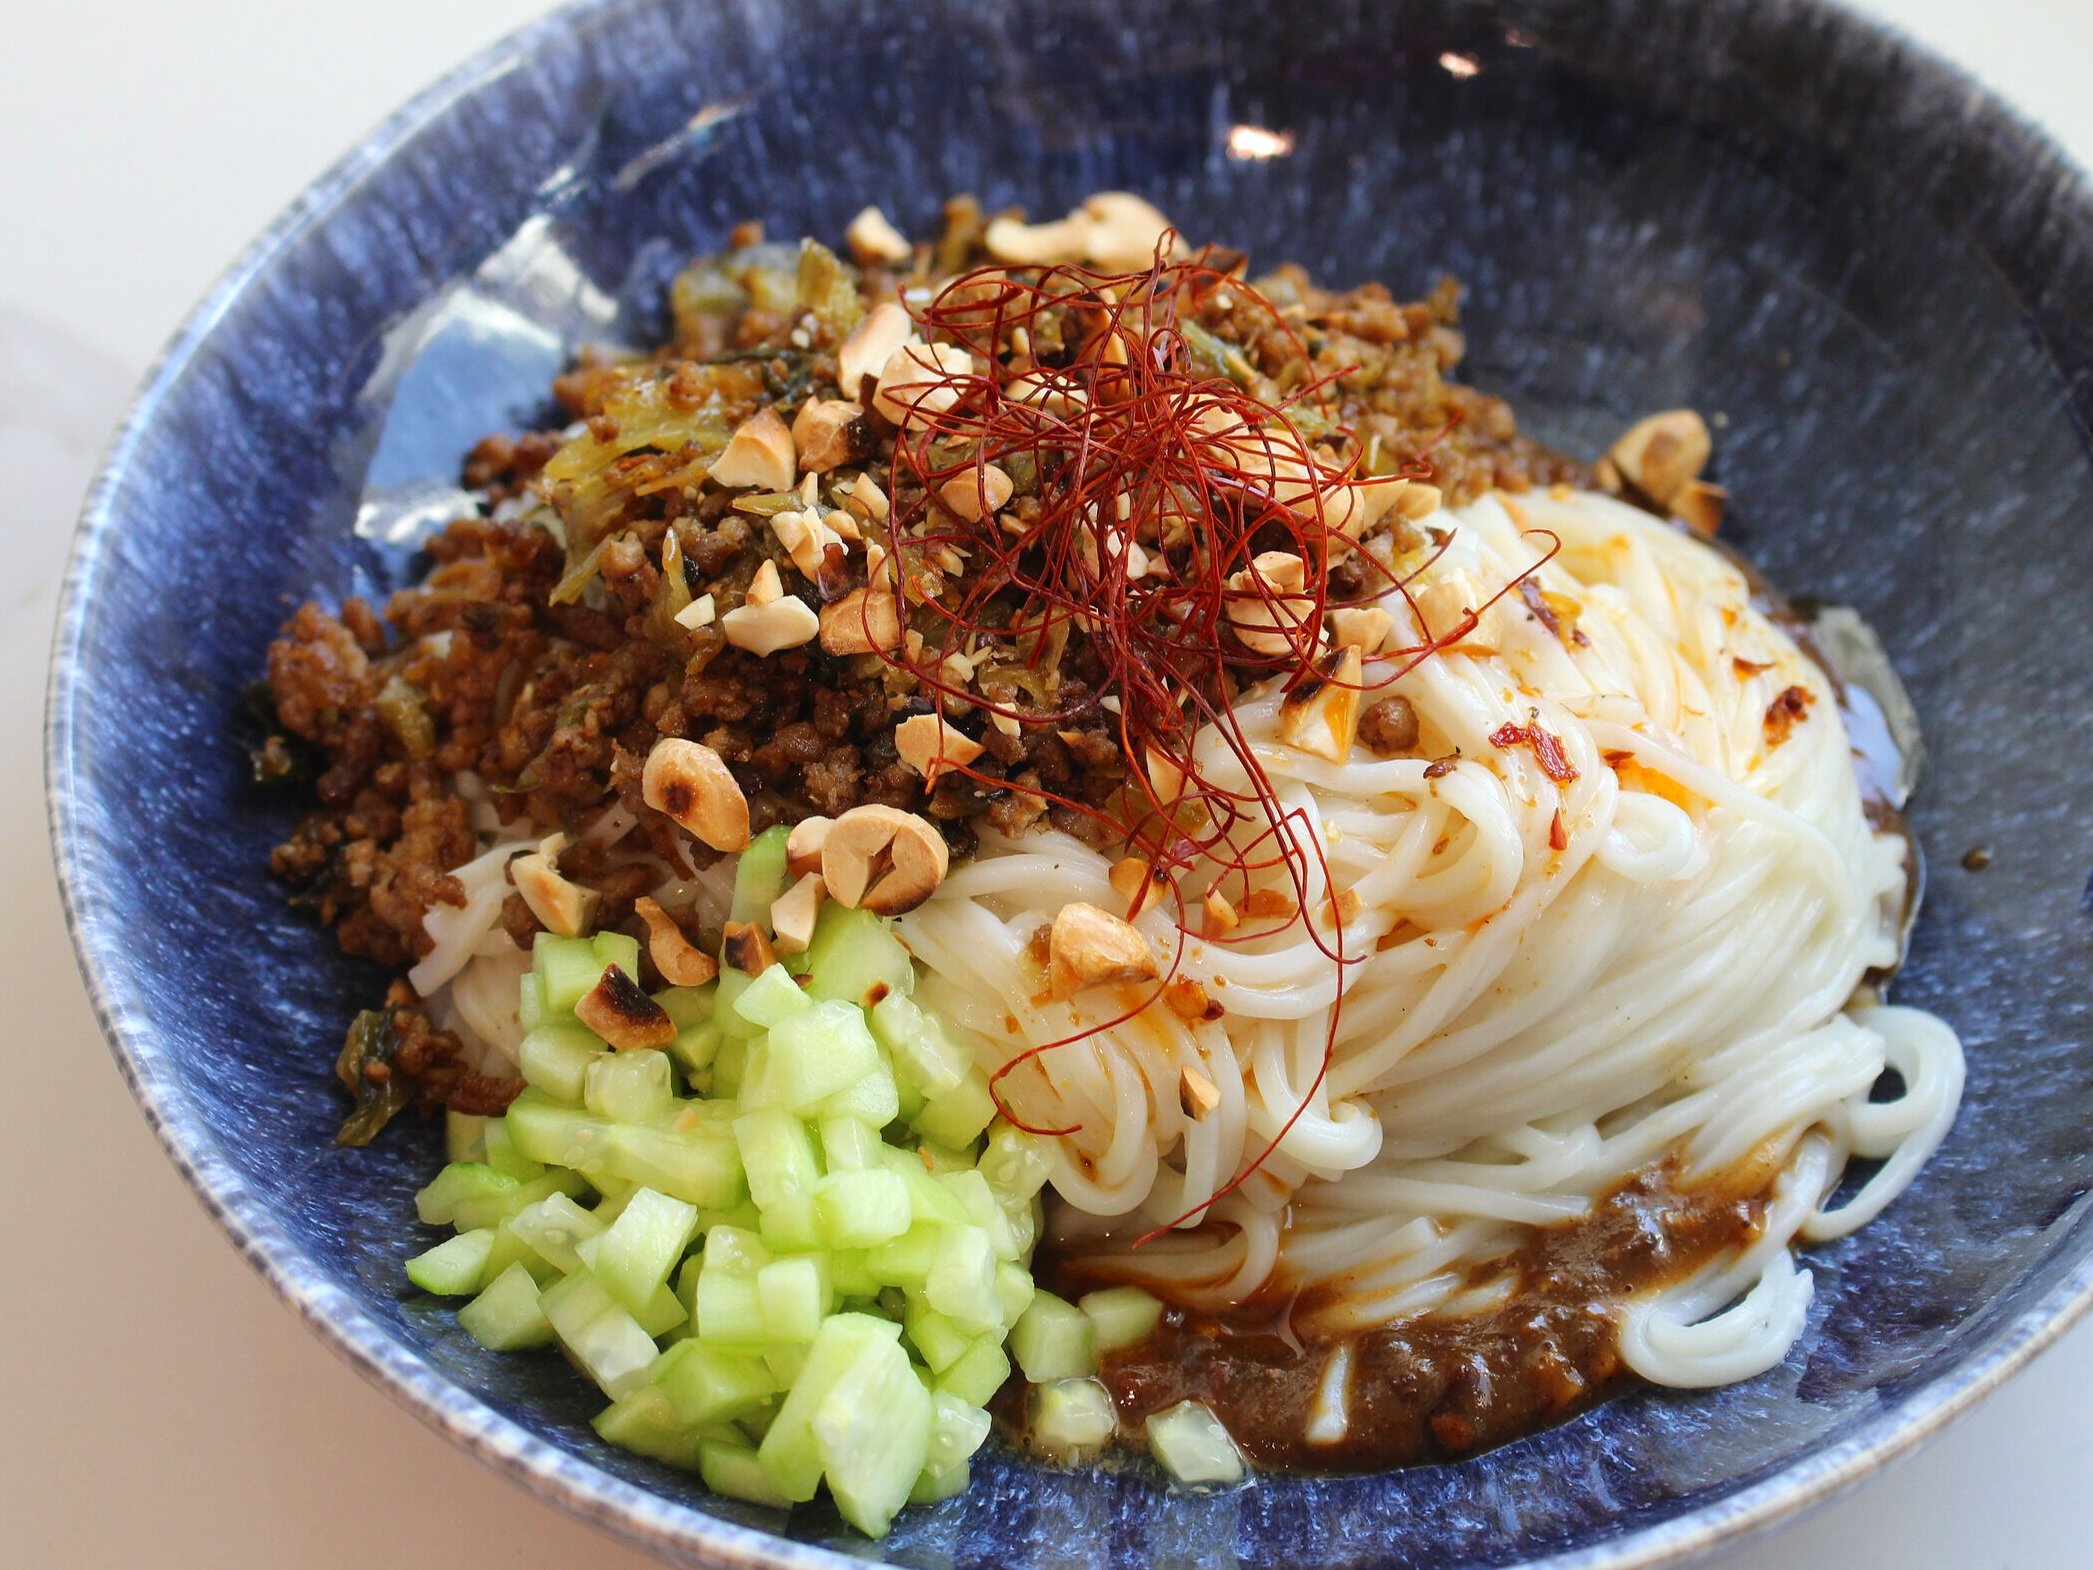
This popular Taiwanese cold noodle dish is pure comfort food to me! On hot summer days, my grandma would make this cool & refreshing dish for my brother and I when we were growing up. Cold noodles are tossed in a nutty, umami-packed, sweet, and tangy sesame sauce, and mixed with some shredded chicken and sliced cucumbers. It’s topped with crushed sesame seeds, a hint of chili peppercorn oil, garlic water, and some scallions. A humble dish that packs a huge punch.  

IMG_4309 (2).JPG

Recipe (serves 4):

  1. Prep toppings: With a mortar & pestle, coarsely grind 2-3 tbsp roasted sesame seeds and set aside in a small bowl. Julienne 1 cucumber. Thinly slice 1 stalk of green onion on the bias. Finally, in a pot of seasoned boiling water, simmer chicken thighs for about 10-15 minutes (or until internal temp reaches 165°F). Remove from heat and rest to cool. Using two forks or your fingers, shred the chicken meat.  

  2. Garlic Water (optional topping): Mince 4-5 cloves of garlic and add about 2 tbsp water. Set aside.

  3. Prep Noodles: Cook 16 oz flour noodles per package instructions. Drain and toss with 1-2 tbsp sesame oil (to prevent sticking). Cover with plastic wrap and let cool in fridge for at least 30-60 min.  

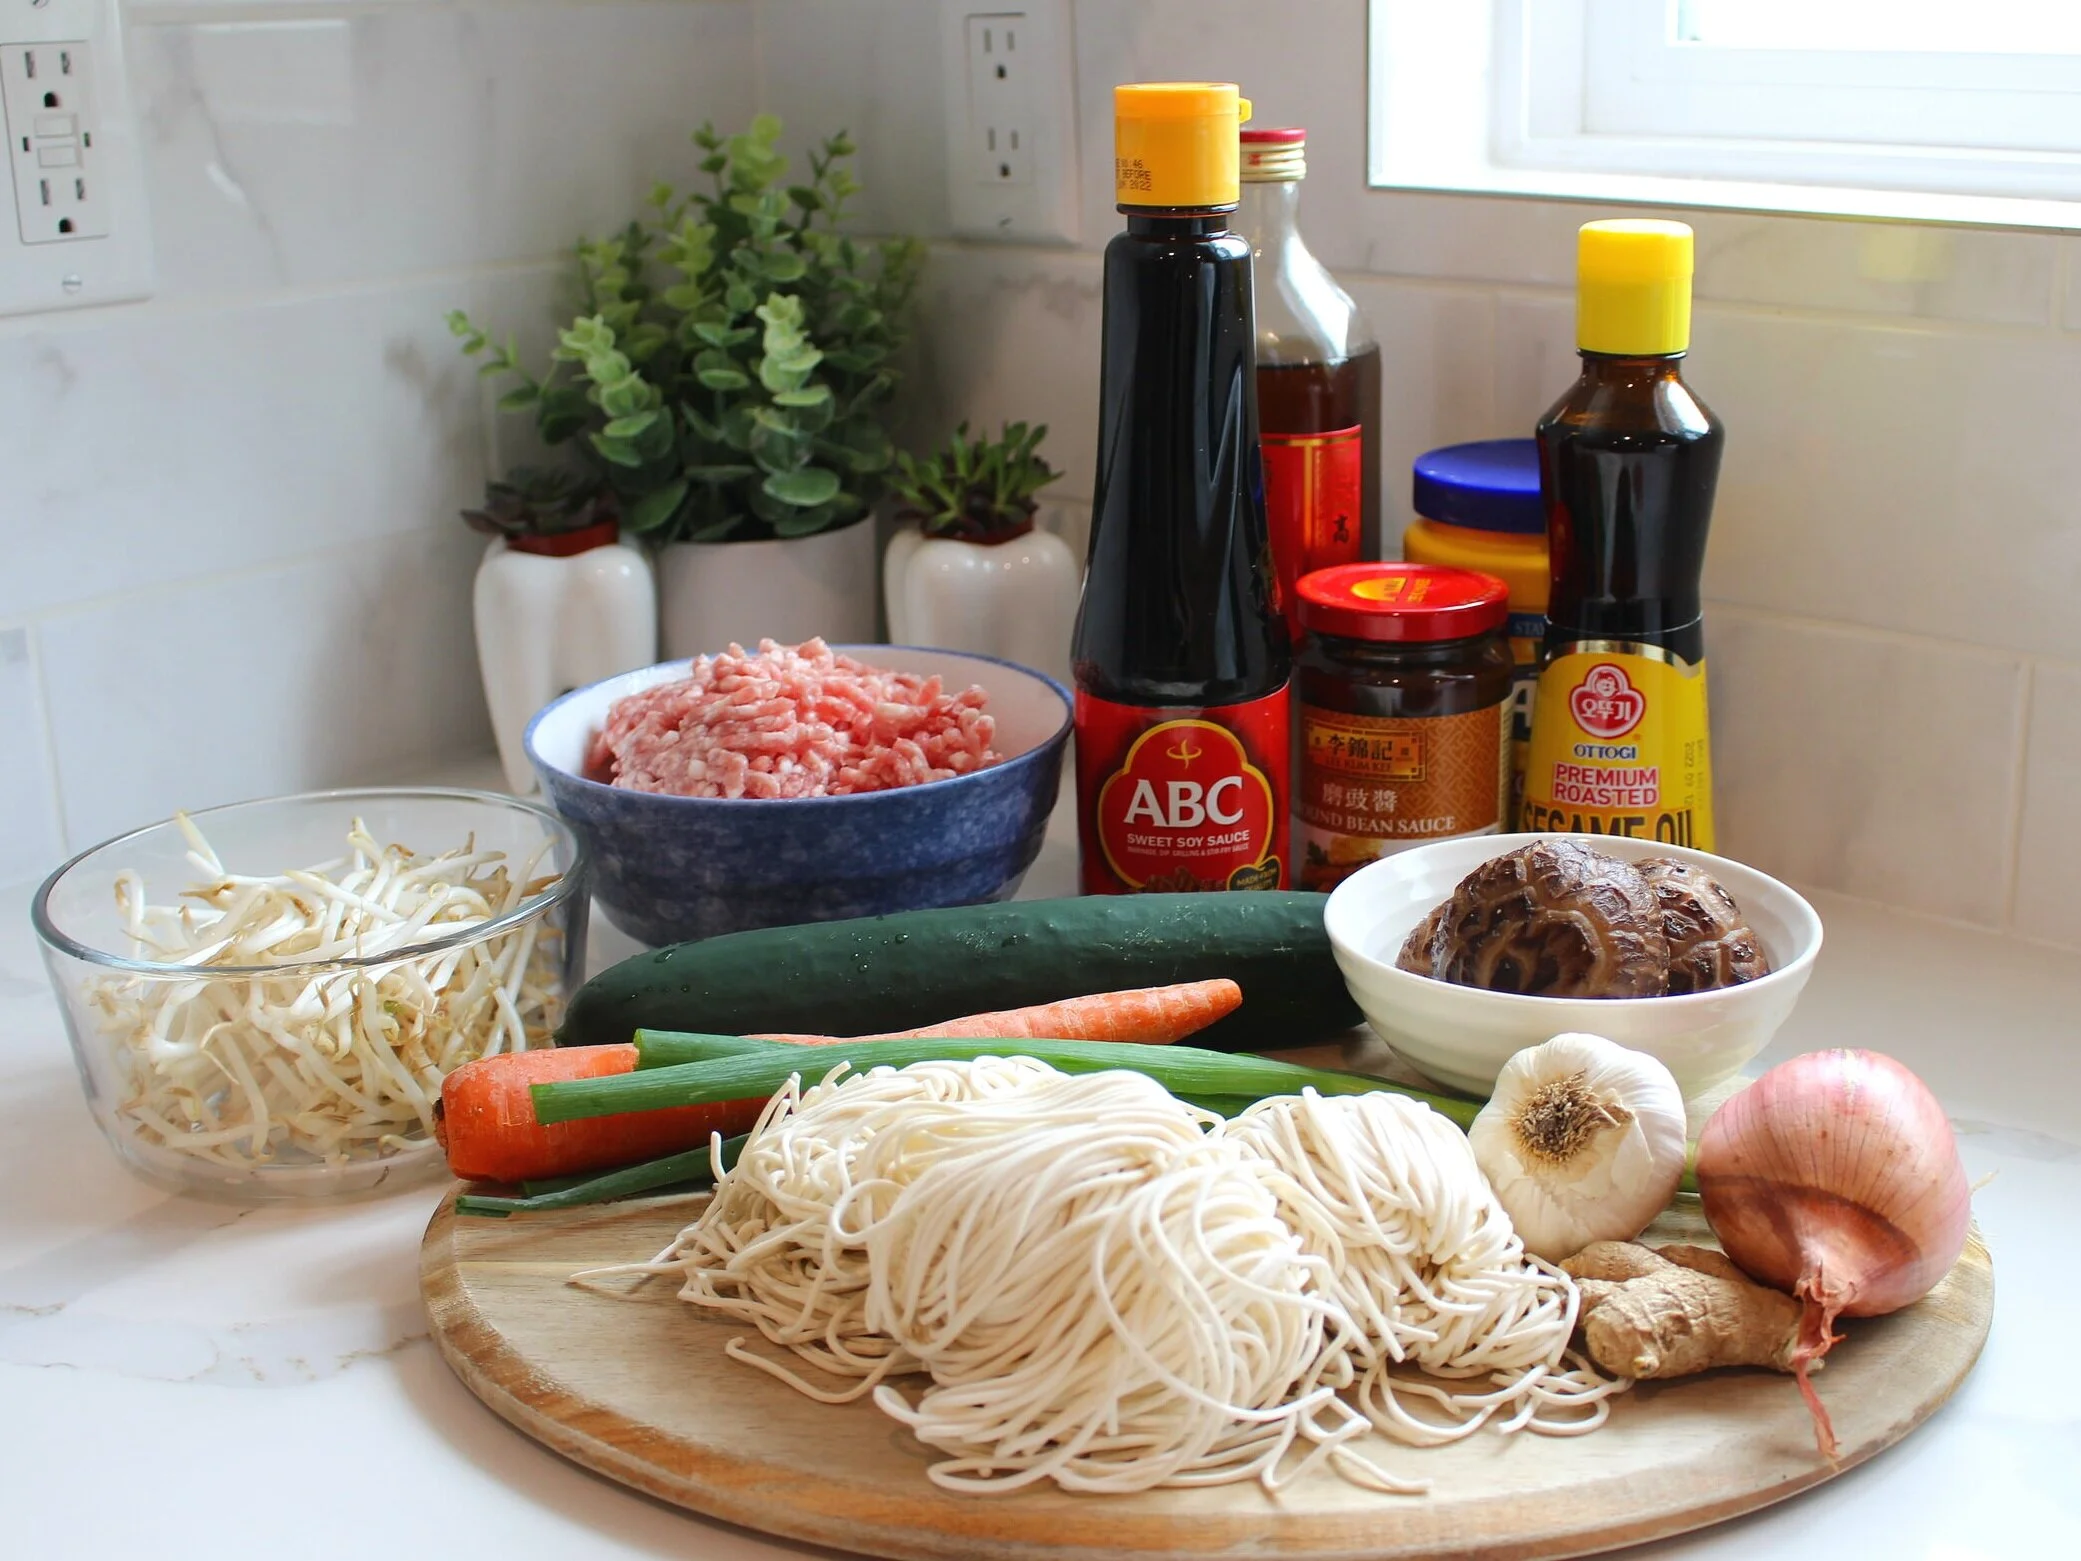
  4. Make the sesame sauce: Whisk together 8 tbsp sesame paste (can sub creamy peanut butter) with 1 chunk of white fermented bean curd (adds huge umami flavor, but you can omit if you can’t find it at your local Asian market). Add in 2 tbsp sesame oil, 3 tbsp light soy sauce, ½ tbsp sweet soy sauce, 3 tbsp Chinese black vinegar (can sub rice vinegar), ½ tbsp chili peppercorn oil, 3 tbsp white sugar, and 1 tsp sea salt. If your sauce is super thick, add in 1-2 tbsp water to thin it out and reach a smooth dressing consistency. Finally, whisk in 1 tbsp Kewpie mayonnaise.

  5. Plating: In a bowl, add in your cooked noodles, add your toppings: a handful of sliced cucumbers, shredded chicken, a spoonful of garlic water, a spoonful of chili oil, crushed sesame seeds, and scallions. Other variations include toppings like sliced scrambled eggs, carrots, and ham. Stir and enjoy!  

IMG_4295.JPG

Elote Tortelloni with Lime and Cotija

Here’s a spin off of Mexican street corn in pasta form! It’s corn season until September, so it’s the perfect time to incorporate this delicious cereal grain into summer dishes! Gluten-free cheese-filled tortelloni are tossed with a creamy sauce, fresh sweet corn, cotija cheese, chili powder, lime, and cilantro! A great summer dish and super easy to throw together!  

IMG_4177 (2).JPG

Recipe:

  1. Prep: Cut off kernels from 4 ears of corn (husk and silk removed) and set aside in a large bowl (should yield about 3 cups). Mince 1 shallot and 3 cloves of garlic.

  2. In a skillet over medium high heat, melt 4 tbsp butter and add in minced shallot. Stir for 1 min. Add in corn kernels and continue to cook for 8-10 min, tossing occasionally (allow some browning for color). Add in minced garlic. Turn off heat.

  3. Meanwhile, boil 3 quarts of water, season w/ salt, and boil 1 package of gluten-free @tasterepublic Four Cheese Tortelloni (9 oz) for 4-5 minutes (or your favorite pasta shape). Strain. Reserve about ½ cup of pasta water in case you need adjust sauce consistency.

  4. To the skillet, add in ¼ cup heavy cream and ¼ cup of reserved pasta water and cook over high heat for 2-3 min (or until it starts to bubble). Turn off heat. Stir in ½ cup Mexican crema (can substitute with sour cream) and 1/3 cup crumbled cotija cheese (can substitute with Parmesan), and add ½ tsp cayenne pepper. Stir.

  5. Add the boiled tortelloni to the skillet and gently toss to evenly coat each tortelloni.

  6. Divide into serving bowls and garnish: sprinkle each bowl with crumbled cotija cheese, lime zest, cayenne pepper (or Tajin seasoning), and micro cilantro.

IMG_4211 (2).JPG

Portobello Fries w/ Basil Aioli

I first had these fries years ago at the well-known Italian restaurant, Bottega Louie. And ever since, I’ve wanted to find a way to replicate them. I think this recipe is pretty close to what I had (or dare I say better? haha). Light and crispy, “meaty” but perfectly tender, and it’s a veritable explosion of umami! I’d eat these fries over potato fries any day!   

IMG_4005.JPG

 Recipe:

  1. Basil Aioli: In a food processor, combine 0.5 oz fresh basil (about ¼ cup, packed), 2 garlic cloves, 1 tsp lemon juice, 2 tbsp extra virgin olive oil. Fold in ½ cup mayonnaise. Set bowl aside in fridge (covered).

  2. Cut 3-4 large Portobello mushrooms (stems removed) into ¾” slices. In a large bowl, add in 3 cups whole milk and soak the sliced mushrooms for 5-10 min.

  3. In a separate bowl, add in 2 cups Wondra flour (a very finely ground all-purpose flour) (Note: you can substitute with Mochiko rice or tapioca flour). I use this flour specifically to make the fries super flaky, light, and less oily!

  4. Working in batches, transfer the sliced mushrooms into the flour and roll around to coat completely. Transfer to a plate.

  5. Heat vegetable oil in a pot to 350°F (enough to deep fry). Working in batches, deep fry mushroom slices for 4-6 minutes (or until golden brown). Note: Avoid adding too many slices in at once, because it’ll drop the oil temp too quickly and your subsequent fry will yield oilier fries (and take longer to cook). Transfer to a paper towel to dry.

  6. Transfer all the portobello fries to a mixing bowl and toss with a handful of chopped parsley (about 1/2 cup), 1-2 tsp seasoning salt (to taste), and ¼ cup parmesan cheese.

  7. Enjoy immediately with a side of basil aioli.  

Pork Zha Jiang Mian (炸酱面)

Literally translates to “Fried Sauce Noodles.” This is a very nostalgic dish for me since my grandma would always make it for my brother and I when we were growing up. This is the Chinese/Taiwanese version, but this sweet-savory meat sauce is universally beloved across eastern Asia; in fact, there are iterations of this dish in both Korean and Japanese cuisines too! Every Chinese household likely has its own recipe, and honestly – from the ones I’ve tasted – they’re all delicious in their own right! Here’s my take on it. Fragrant, succulent pork and shiitake mushrooms served on top of chewy noodles, finished with crisp & refreshing cucumbers, carrots, and bean sprouts! Major comfort food! Save this recipe!

IMG_3579.JPG

Recipe: Pork Zha Jiang Mian (炸酱面) (serves 4)

Ingredients:

  • 8-10 oz ground pork (80% lean/20% fat or 70% lean/30% fat), or ground pork belly (do not use lean pork for this recipe)

  • 3-4 tbsp sweet soy sauce (ABC® Sweet Soy Sauce)

  • 2½ tbsp ground bean sauce (yellow soybean paste)

  • 3 tbsp Shaoxing/Shaohsing cooking wine

  • 3 Shiitake mushrooms (stem removed and finely chopped; if dry, reconstitute in hot water for at least 30 minutes) (optional)

  • ½ lb dry or 1 lb fresh wheat noodles  

  • 1” piece fresh ginger (peeled, minced; should yield about 1 tbsp)

  • 1 Shallot (finely chopped)

  • 4-5 cloves garlic (minced)

  • 2 tbsp vegetable oil

  • ½ tsp sesame oil

  • 3 tsp cornstarch

  • ¼ tsp white pepper

  • 1¼ cup water

  • 1 cucumber (julienned)

  • 1-2 stalks green onion (chopped on a bias)

  • 1 carrot (peeled, julienned)

  • Bean sprouts (1-2 cups)

  • 1-2 tbsp chili oil (optional)

Can’t find ABC® Sweet Soy Sauce? Click the link below!

IMG_3551.JPG

Steps:

1. In a bowl, mix ground pork with ½ tsp sesame oil, white pepper, and 1 tsp corn starch.

2. Prep your toppings: Wash all vegetables and julienne your cucumber, green onion, and carrot. Set aside. Note: you can be creative with your toppings, including bean sprouts, thinly sliced radishes, etc.   

3. In a clean skillet or wok over medium high heat, heat vegetable oil and fry your aromatics: chopped shallots, minced ginger, and minced garlic. Cook for about 1 minute. Add in your marinated ground pork and cook for 3-4 minutes until golden brown.

4. Optional: Add in chopped Shiitake mushrooms. Sauté for 1 minute.

5. Add in sweet soy sauce (ABC® Sweet Soy Sauce), ground bean sauce (yellow soybean paste), Shaoxing cooking wine, and mix to incorporate evenly for about 1 min.

6. Add in 1 cup water. Simmer on low heat for 10-15 minutes (uncovered), stirring occasionally, until it has reduced (should be a thick shiny gravy consistency). If not thick enough, add in a slurry of cornstarch water (2-3 tsp cornstarch mixed into 1/4 cup water). If too thick, add in another ¼ cup water to dilute.

IMG_3559.JPG

7. Add 1-2 tbsp chili oil (if you prefer spicy).

8. While pork sauce is simmering, cook noodles according to package instructions (usually 3-5 minutes). Drain.

9. Plate your noodles, top with zha jiang pork mixture, and serve with julienned cucumber, green onion, bean sprouts, and carrots. Mix before eating.


IMG_3563.JPG
IMG_3588 (2).JPG

Tonkatsu (とんかつ; Fried Pork Cutlet) w/ Cabbage Coleslaw and Egg Fried Rice

This hugely popular Japanese dish is super crispy & crunchy and has a nice juicy pork center. Very economical, comes together in minutes, and can easily be made at home to taste just like the restaurants! I like to make mine a complete meal with some egg fried rice and some green cabbage coleslaw (for that nice acidic & creamy crunch)! Top it off with some sweet & savory tonkatsu sauce, and I’m sure it’s a dish you’ll come back to time & time again!

IMG_3149.JPG

Recipe for Tonkatsu:

  1. With a meat tenderizer/pounder (or the back end of a cleaver or heavy duty knife), gently pound 4 Boneless Pork Loin Chops (about 1.5 lb) (top and bottom) (Note: don’t pound completely flat. You just want to tenderize it a bit). Season with garlic salt and pepper (on top and bottom).

  2. Set up a breading station with 3 shallow dishes. Place 1 cup corn starch in the first, 2 eggs (lightly beaten) in the second, and 1-1.5 cups of panko bread crumbs in the third.

  3. Coat each pork chop in the corn starch by gently pressing the loin into the starch and shaking off the excess (make sure to get the sides as well).

  4. Next, dip the pork loin into the egg and coat completely.

  5. Finally, dredge into the panko bread crumbs and shake off excess. Note: try to designate a dry and wet hand so it doesn’t get too messy with all the clumping!

  6. Fill a pan with vegetable or corn oil to about 1” depth and heat oil over medium heat to about 350°F (use a thermometer if possible). Shallow fry each pork loin 3.5-4 min (on each side) or until internal temp reaches 145°F (63°C) and the crust is golden brown. Note: Don’t overcrowd the pan; depending on the size of your pan, cook only 1-2 chops at a time.

  7. With a fish slice or slotted spatula, remove the pork loin and set on paper towels to drain excess oil. Rest for 5 minutes. Slice and enjoy! (Don’t forget to properly & environmentally dispose of your cooking oil; NEVER pour it down those pipes!)


Recipe for Cabbage Coleslaw:

  1. Shred ¼ head of green cabbage (or use about one package of pre-shredded cabbage; usually about 10 oz), and transfer to a large mixing bowl.

  2. Add in 2 tbsp sesame oil, 2 tbsp rice wine vinegar, and ¼ cup Japanese mayo (just eyeball it). Toss gently with tongs. Add in 1 tbsp sesame seeds.

  3. If you like, add more vinegar, mayo, or salt/pepper to your taste. Ready to serve!

Bulgogi Kimbap/Gimbap (김밥)

This colorful Korean staple is perfect for spring or summer picnics or enjoyed on-the-go, and it’s packed full of a variety of ingredients! While prepping all the ingredients, you’ll likely smell the delicious nutty aroma of roasted sesame oil, which I add to many of the components and also at the end to coat each roll (for that extra shine and aroma)! I chose to use Ribeye roll bulgogi, egg, carrots, imitation crab, spinach, danmuji, and cucumbers, but you can use your imagination for your own ingredients! (PSA: I learned from my Korean friends not to call this sushi! It’s like referring to a Greek gyro as a Mexican burrito. Oops!).  

IMG_3097 (2).JPG

Ottogi Roasted Sesame Oil: Voted as the top sesame oil in America’s Test Kitchen, this sesame oil has a beautiful deep golden color and a temptingly nutty aroma. I use it most often as a finishing oil, but I also add it to many marinades and to occasionally stir-fry as well. Just 1-2 teaspoons go a long way in imparting a full-bodied, nutty aroma! Great to have on hand in any pantry. It can be purchased at most Asian supermarkets or online on Amazon!

IMG_3077.JPG

Assembly:

  1. Place one seaweed sheet (shiny side down) onto a bamboo mat roller.

  2. Place about ½ cup seasoned rice or just enough to thinly spread over the bottom 2/3 of your seaweed (leave about 2” space up at the top).

  3. Sprinkle on some furikake rice seasoning (I used Ottogi’s Rice Friend Vegetable Flavor) (optional).

  4. Staying in the middle of your rice, horizontally place all ingredients in one by one, making sure not to add excessive amounts (will make it difficult to properly wrap; don’t follow my mistake, haha!).

  5. With your thumbs as support underneath the bamboo roller, use the rest of your fingers to firmly compact the fillings and then begin to roll forward/upward.

  6. Once the bottom end of the seaweed has reached the end of your rice line, light squeeze the roller to further compact the ingredients.

  7. Unroll the bamboo mat, place a little sesame oil on the exposed seaweed with your finger, and complete the roll

  8. Before serving, to create extra shine and flavor, coat the entire surface of the kimbap with toasted sesame oil (with a brush or your fingers). Carefully rub sesame oil over your knife and slice about ½” pieces. Serve and enjoy immediately!

IMG_3105 (2).JPG

Soy Garlic Fried Chicken (간장마늘 양념치킨)

This chicken is covered in an incredibly crispy shell (from the potato starch and the double-fry) and is super tender & juicy on the inside! It’s sweet, sticky, tangy, and super addicting! Add some gochujang if you like spice! If you’re tired of only watching people eat this in KDramas (haha) or just love fried chicken, give this recipe a try!

IMG_2969.JPG

Recipe:

  1. Season 2 lb of chicken (wings/drummettes/drumsticks/tenders) with ½ tsp sesame oil, 1 tsp ginger (grated or minced), 1 tsp garlic salt, and ½ tsp white pepper.

  2. In a large Ziploc bag or container, add in ½ cup panko breadcrumbs and 1 cup potato starch. Shake to combine. In small batches, drop the chicken into the bag/container and shake until well coated.  

  3. In a deep skillet, pot, or deep fryer, heat about 4 cups of vegetable oil to 325F (or enough to achieve about 2” depth; make sure the oil doesn’t rise more than halfway up the cooking vessel to avoid oil overflow). Deep fry chicken for approx. 7-8 minutes (wings), 9-10 minutes (drumsticks), and/or 4-5 minutes (boneless chicken tenders) [Note: cooking times vary for each cut of chicken and stove]. Promptly remove from fryer and place on a wire cooling rack (over a baking pan) or paper towel-lined plate to drain excess oil. Set aside for about 10 min.

  4. Bring oil up to 375F. Deep fry chicken a second time for about 30 seconds-1 minute (should be golden brown). Drain again on cooling rack or paper towel. Transfer to a large metal mixing bowl.

  5. Glaze: In a skillet over low/medium heat, add in 2 tbsp vegetable oil and heat 8 cloves garlic (minced) for about 2-3 min. Add in ¼ cup (or 4 tbsp) sweet soy sauce, ¼ cup (or 4 tbsp) honey, ½ tbsp sesame oil, 3 tbsp rice wine vinegar, and 1-2 tbsp water (optional: add in 1 tbsp gochujang, if you like spicy).  Bring to a simmer and continuously stir until sauce has slightly thickened and has a shiny glaze (about 2-4 min). [Note: Make sure to not cook it too long or it will over-thicken and will be difficult to coat the chicken]

  6. Immediately drizzle the sauce over the chicken and toss to coat.

  7. Sprinkle on white sesame seeds and chives (optional). Serve with pickled daikon radishes (cubed).

IMG_2966.JPG

Shrimp Pomelo Salad (Yum Som-O; ยำส้มโอ)

Pomelos are the larger & sweeter cousins of grapefruits, and they’re less bitter & tangy as well. This bright salad combines the sweet pomelo fruit with succulent chilled shrimp, fragrant herbs (mint, cilantro, Thai basil), toasted coconut, fried shallots, and roasted peanuts. My variation of this classic Thai salad adds in some Vietnamese influences with the pickled carrots, turnips, and lotus roots, for some additional texture and brightness!

IMG_2852.jpg

Day Before:

  1. Prep (Pomelo): Harvest the flesh from 2 medium-sized pomelos (should yield about 3 cups of flesh). How to break down a pomelo – Cut off the top ¾” of the pomelo (near the stem). With a sharp knife, score the skin/rind into 6-8 segments, making incisions about ½” deep and going length-wise to the opposite end of the pomelo. With your fingers, gently insert your thumbs in the center (where the stem was) and peel apart. Pull away the pith/membrane and harvest the pomelo flesh. Try to keep flesh as bite-sized chunks. Refrigerate in a bowl covered for at least 1 hour.

  2. Prep (pickled veggies): In a jar, mix together 4 cups water, 1 tbsp salt, 3 tbsp sugar, and ½ cup rice vinegar. Peel and julienne 1/3 cup carrots and 1/3 cup daikon radish. Place in a jar and submerge with pickling liquid. Refrigerate overnight.

  3. Prep (lotus root; optional): For the lotus root, you can buy it pickled at your local Asian store. If you’re working with fresh lotus root, peel the skin, cut off the ends, and cut into ½” slices. Soak in a bowl of 3 cups water w/ added 1 tsp rice vinegar for 5 min (to help remove astringent taste). In a pot, combine 3 cups water, ½ cup sugar, 1 tsp salt, and ½ cup rice vinegar. Boil for 10 min. Transfer to a container/jar and fill the jaw with the liquid you cooked it with. Refrigerate overnight.

IMG_2828.jpg

 Day Of:

  1. Prep (shrimp): Boil ½ pound of shrimp (peeled, deveined) for about 1- 1½ min and shock in ice cold water. Drain and set aside in fridge.

  2. Prep (herbs): Coarsely chop ¼ cup mint, ¼ cup cilantro/coriander, and ¼ cup Thai basil.

  3. Prep (mix-in/garnish): Toast ½ cup shredded unsweetened coconut in a skillet until crisp & golden brown (about 4-5 min over medium heat). Crush 2 tbsp roasted peanuts with a mortar & pestle (or coarsely chop with a knife). Set aside ¼ cup fried shallots (can be purchased premade at Asian stores)

  4. Dressing: Combine 2 cloves of garlic (minced), 1 Thai chili (finely chopped), 2 tbsp lime juice, 2 tsp fish sauce, and 1 tbsp palm sugar (or white sugar). Mix thoroughly w/ a whisk.

Combine all ingredients in a large mixing bowl, add dressing, and mix gently, making sure not to break apart too much of the pomelo flesh. Garnish with more herbs, fried shallots, roasted peanuts, and toasted coconut!

You can enjoy it as is, or serve it on top of a bed of chopped butter lettuce or your favorite spring mix.

IMG_2849.jpg

Vietnamese Pork Banh Mi Burger

This juicy pork burger definitely hits the spot if you need to satisfy your banh mi craving! Vietnamese food in general is super fragrant, bright, and fresh (not to mention very affordable)! This burger has great textural and flavor contrast with the crunch & sweet tang of the pickled veggies, creaminess of the chicken pǎté, slight kick from the jalapenos and sriracha aioli, and juiciness from the seasoned pork patty. It’s all nestled in between two fluffy, buttered, and lightly toasted brioche buns. Give it a try and lemme know how you like it!    

IMG_2768.jpg

Recipe:

Prep Pickled Veggies (at least 1 day before):

  1. In a jar or bowl, mix together 4 cups water, 1 tbsp salt, 3 tbsp sugar, and ½ cup vinegar (either rice vinegar or distilled white vinegar).

  2. Peel and julienne about 1/2 cup carrots (about 2-3 small carrots or 1 large carrot) and 1/3 cup daikon radish

    Note: You can continue using your peeler to shave off thin strips and then julienne them, or you can carefully cut them into thin matchsticks, closely resembling the size/width of an average chopstick

  3. Drop all of the veggies into the jar, making sure to submerge them beneath the vinegar mixture. Refrigerate overnight for a quick pickle (or ideally for 2-3 days). Extra can be kept in fridge for additional 2 – 2 ½ weeks. Note: If you like spice, you can add some chopped red chilis into the pickling jar as well.

Prepare Sriracha Aioli: Mix together 2/3 cup Kewpie mayo (or regular mayo), 1 tbsp sriracha (depending on how much spice you like), and a generous squeeze of lime.

IMG_2746.jpg

Prep Pork Burger Patty: makes about 4-5 burgers

  1. In a bowl, mix together 1 lb ground pork (can substitute ground beef or ground chicken), ¼ cup finely chopped fresh basil, 2 stalks of green onion (finely chopped, both white and green parts), 4 cloves of garlic (finely grated or minced), 1 tbsp fish sauce, 1 tsp hoisin sauce, 1 tsp cornstarch, 1 tsp black pepper, and 1 tbsp finely chopped lemongrass (optional) [Chop the root-end off of 1 lemongrass stalk, bruise the bottom portion with the back end of a knife, peel off the outer fibrous layer, and cut off the pale portion. Finely dice that pale portion and add to the meat mixture].  

  2. With your hands, form patties that are slightly larger than the diameter of your burger bun, and make a slice indentation in the center (so the patty doesn’t tighten/shrink too much).

  3. In a skillet, cook the patties on medium high heat for 4-5 minutes per side (or until internal temp reaches 145°F). Set aside to rest for ~5 minutes.

Prep Buns: In a separate skillet over low medium heat, quickly toast your burger buns (I used brioche) with some butter, until golden and crispy (about 1-2 minutes).

Prep Miscellaneous Ingredients:

  1. Take out your pickled veggies from the fridge and drain before burger assembly.

  2. Wash and thinly slice some Persian cucumbers.

  3. Wash and separate some fresh cilantro leaves.

  4. Wash and thinly slice 1-2 jalapenos

IMG_2751.jpg

Burger Assembly: On each bun, slather on some sriracha aioli. If you like, on the bottom bun, add a nice layer of chicken liver pǎté (liverwurst). Follow that up with a nice handful of pickled veggies, sliced cucumbers, cilantro, and sliced jalapenos. Next, place your patty down, followed by more veggies and then finally the top bun. Enjoy!

IMG_2769.jpg

Baked Feta Pasta

Finally got around to trying the trending #fetapasta recipe (I believe it went viral first in Finland and then on TikTok)! Anyway, I was curious and wow… This is an extremely low-effort dish made with just a handful of easily obtainable basic ingredients, but it packs a punch of flavor! The salty tang of the creamy feta cheese pairs well with the sweet burst from the tomatoes & fragrant freshness of the basil. Definitely a dish I’d go back to again. If you’re looking for feta, make sure it’s made from sheep’s or goat’s milk, which I feel is more creamy than those made from cow’s milk (those imposters! haha).    

IMG_2737.jpg

Recipe:

  1. Prep: Preheat oven to 400°F. Mince 5 cloves of garlic. Wash 1-2 pints of cherry or grape tomatoes and quickly rinse ¼ cup fresh basil (1 large sprig) and julienne into thin strips.

  2. In an oven-safe baking dish or pot, pour in your tomatoes, place an 8 oz block of sheep (or goat) milk feta cheese in the center and cover in ½ cup extra virgin olive oil. Gently toss to coat. Sprinkle minced garlic over the top and cover with lid.

  3. Bake in oven for 40-45 minutes (just until the tomatoes have burst and feta cheese is meltingly soft).  

  4. In a large pot, cook 8 oz cavatappi pasta (or your favorite pasta shape) for about 8-10 minutes in boiling water (seasoned to taste w/ salt). Drain and set aside.

  5. Remove baking dish from oven and immediately sprinkle in julienned basil. Gently break apart cheese with a fork and then mix with a spatula until all ingredients are well-incorporated.

  6. Carefully transfer the cooked pasta to baking dish and toss gently to combine and coat. Season with black pepper and garnish with a few leaves of fresh basil.

Hawaiian Garlic Shrimp

These succulent shrimp are covered in an extra garlicky, rich butter-based sauce, very reminiscent of those delicious bowls of shrimp from the local legendary food trucks in Hawaii! It’s packed full of flavor! And, it turns out that it’s very simple to make! No need to book a flight to Hawaii (haha); anyhow, we are all pretty grounded for the time-being due to travel restrictions. Can’t wait for things to slowly return back to normal! Really miss seeing all my  friends and family! Hope you are all safe and well!  

Warning: You just may need a swish of mouthwash after consuming this deliciousness! My go-to is ACT Total Care anticavity fluoride rinse (alcohol-free)!

CD739293-6091-4F56-86B3-4841C2DC6630.jpg

 Recipe:

  1. Prep: Clean and devein 1 pound of jumbo shrimp (shell off or on, whatever your preference; leaving shells on likely adds more flavor, but I deshelled them because I’m pretty lazy when I eat). Finely dice 15-20 large cloves of garlic. Finely dice 2 shallots.

  2. In a large resealable bag, place 3 tbsp all-purpose flour, 1 tbsp corn starch, 1 tsp paprika, 1 tsp onion powder, 1½ tsp sea salt, and 1 tsp black pepper in a large resealable bag. Shake to mix.

  3. Add shrimp into the bag and shake to evenly coat. Remove from bag and set aside.

  4. In a large skillet/pan over medium heat, melt 1 stick of unsalted butter (ie. ½ cup) and then add 1 tbsp olive oil. Once melted, add in diced garlic & shallots, 1 tsp chopped chili flakes, 1 tsp cajun seasoning, 1 tsp oyster sauce, ½ tsp sugar, 1 tbsp white wine (Pinot Grigio, Sauvignon Blanc, etc), and cook for 2-3 min (until garlic is lightly browned). Adjust sauce with ½ tsp chicken bouillon as needed. Remove garlic butter sauce from heat and set aside in a bowl.

  5. Add in additional 3 tbsp olive oil and once heated, add in the shrimp. Cook over medium high heat for 2-3 min each side.

  6. Pour in the garlic sauce and stir to coat. Garnish with green onion or chopped parsley, and add a squeeze of lemon!

  7. Serve with macaroni salad, fresh (or lightly sautéed) pineapple, and some white rice (jasmine).

Cream of Mushroom Soup

This is an adaptation of a recipe given to me by one of my amazing patients! The payoff for the extra time spent making it yourself is absolutely worth it! This comforting warm bowl of soup is super creamy, packed with umami from the natural flavor of mushrooms, and the fresh & dry herbs definitely add depth (compared to your canned soups)! I thought I’d switch it up with a play off of biscuits & gravy, so I paired the soup with some homemade cheddar biscuits.  

IMG_2699.jpg

Recipe:

1.       Prep: Mince 2-3 whole shallots (should yield about ¾ - 1 cup) and 4 cloves of garlic. Chop up about 2 tsp of fresh thyme leaves. Clean and then roughly chop about 2 pounds of your favorite mushrooms (any combination of baby bella/cremini, button, shiitake, etc). Note: Limit the use of stronger-flavored mushrooms to about a small handful (e.g. chanterelles, morels, shiitakes). In my recipe, I used about 45% brown baby bella/cremini, 45% white button, and 10% shiitake mushrooms.  

IMG_0509.jpg
IMG_0512.jpg

2.       In a pot or preferably a cast-iron dutch oven, add 2-3 tbsp olive oil and sauté minced shallots and garlic for about 2-3 minutes over medium high heat.

3.       Add in 4 tbsp butter, your chopped mushrooms, and 2 tsp chopped thyme. Continue to cook until browned and most of the water has been released (about 5-7 min). De-glaze with about 1/3 cup dry white (Pinot Grigio or Sauvignon Blanc) or red wine (Pinot, Merlot, Marsala), and cook for another 3-4 minutes (optional step; omit if you prefer no alcohol). Remove a large spoonful of the sautéed mushrooms (for garnish).

4.       Sprinkle remaining mushroom mixture with about 4 tbsp all-purpose flour and cook for 2 minutes.

IMG_0514.jpg

5.       Add in ¾ tsp dried tarragon, 4 cups of chicken stock (or vegetable stock), ½ tbsp chicken bouillon (optional), and 1 tsp sea salt. Mix well and then bring to a boil. Reduce heat to medium low, cover, and allow to simmer for 10 minutes.

IMG_0515.jpg

6.       Turn off heat. With an immersion blender or using a standup blender/mixer (in batches), puree soup until it reaches a smooth consistency. Adjust desired thickness of soup with more stock or water if necessary. Alternatively, you can also skip this blending step entirely if you like.

7.       Stir in ¾ cup half & half (or heavy cream, if you desire more richness). Turn heat to medium and cook for additional 2 min. Add salt and ground black pepper to taste.

IMG_0516.jpg
IMG_0517.jpg

8.       Garnish with sautéed mushrooms, fresh thyme, and extra virgin olive oil. Enjoy with garlic bread, crackers, or cheddar biscuits!

Dan Dan Noodles (担担面)

IMG_2667.jpg

Here’s my take on the classic Chinese Sichuan dish (note: it’s probably not traditional, haha); this spicy noodle dish combines the flavors of succulent minced pork with the floral spiciness of Sichuan peppercorns, the bright acidity of pickled mustard greens, fragrant chili oil, and savory toasted sesame paste. I paired it with pickled cucumbers, but you can also quickly blanch some bokchoy or spinach to accompany this dish as well!


RECIPE:

IMG_0319.jpg
  1. Sichuan peppercorns: In a small saucepan, quickly toast ½ tsp Sichuan peppercorns for 2-3 minutes on high heat to release their floral aroma. Transfer to a mortar and pestle, and grind to a fine powder and set aside.

  2. Prepare the Sauce:

    a. In a large bowl, combine 2 tbsp sesame paste (tahini or even peanut butter, if you can’t find this at your local Asian grocer), 2 tbsp light soy sauce, 2 tsp sugar, 2 tbsp chili oil [I used my favorite pre-made version (shown here), but you can definitely make your own], ¼ tsp five-spice powder (for that cinnamon and star anise aroma), ½ tsp Sichuan peppercorn powder (that you ground earlier), and 2 cloves of garlic (minced). Mix all ingredients together until well incorporated.

    b. Modifications: If you enjoy that numbing sensation that uniquely comes with Sichuan peppercorns, feel free to add more. Likewise, if you like things VERY spicy, add an additional tbsp of chili oil.

    c. Incrementally add some hot water if the sauce appears to thick (up to 1/3 cup). The consistency should mimic a salad dressing (not too thick or runny).

  3. Prepare Ground Pork Mixture:

    a. In a skillet or wok, heat 1 tsp oil (vegetable, canola, or corn) over medium high heat and brown ¾ pound ground pork (I used 80% lean ground pork shoulder).

    b. Deglaze with 1 tbsp Shaoxing cooking wine (you can substitute with dry sherry if you can’t find this anywhere). Turn heat to low.

    c. Add in ½ tbsp chili bean sauce (optional), 3 cloves of garlic (minced), ½ tbsp minced fresh ginger, 2 tsp dark/sweet soy sauce (for color & sweetness), 2 tsp hoisin sauce, and ½ tsp five spice powder, and cook for another 2-3 minutes. Set aside.

    d. In the same skillet, sauté 1/3 cup pickled mustard greens (chopped) for 2-3 min. Turn off the heat, add the meat mixture back, and quickly toss to incorporate. Note: I used freshly pickled mustard greens, but you can more easily find preserved mustard greens (sui mi ya cai; 碎米芽菜) at your local Asian grocer (or order online).

    e. Set aside mixture in a bowl until ready to plate.  

  4. Prepare the Noodles: Cook about 1 lb of noodles (I used fresh handmade flour noodles, but whatever long noodle you like should be fine. I’d try to avoid egg noodles if possible. Dry or fresh noodles are fine). Noodles should take about 3-5 minutes (follow your specific package instructions).  

  5. Plating:

    a. In a large bowl, place 2 heaping spoons of sauce, followed by some noodles and then finally the pork mixture on top.  

    b. Garnish with chopped roasted peanuts, more chili oil, pickled cucumber (finely diced cucumber mixed with some rice wine vinegar & sugar), and/or your favorite veggies (blanched in the pasta water for 20-30 sec). Mix together and enjoy immediately!

IMG_0315.jpg
IMG_0316.jpg
IMG_2675.jpg

Shiitake Mushroom Chicken (香菇雞)

IMG_2402.jpg

A dish packed with deep rich flavor from the concentrated umami of dry Shittake mushrooms & premium oyster sauce! This nostalgic, childhood-favorite dish is one that my mom always made for us growing up. Thought I'd share!

Recipe:

  1. Prep (day before): A) In a bowl, marinade a combo of chicken breasts or thighs (cut into ½” pieces) and/or wings in a mixture of 1 tbsp premium oyster sauce, ½ tsp garlic salt, 2 tsp soy sauce, 1 tsp sesame oil, 1 tsp corn starch, and a dash of white pepper. Keep in fridge for min. 3 hrs (or overnight for best results). B) In a separate bowl, soak 6-8 pieces of dry Shiitake mushrooms in water for about 4-5 hrs (or overnight) at room temperature.

  2. Once rehydrated and ready to cook, remove mushrooms from water & cut off the stems. Reserve mushroom soaking liquid. Slice up mushrooms at a bevel at about ¼” thickness.

  3. Cut 3-4 slices of ginger. In a pan over medium high heat, sauté ginger in 2 tbsp of vegetable oil for about 30 seconds. Add in 1 tsp sugar and quickly stir for about 10 seconds.

  4. Immediately add in seasoned chicken chunks and cook for 6-8 minutes. Once thoroughly cooked & slightly browned, remove the chicken from the pan and set aside on a plate.

  5. To the pan, add in the mushrooms and sauté for about 2-3 minutes, or until the mushrooms turn golden brown.

  6. Turn down heat to medium. Add the cooked chicken back into the pan and mix well. Add in ½ cup of the reserved mushroom liquid, and add 1 tbsp of a 1:1 mixture of cornstarch & water to thicken up the sauce.

  7. Taste & add additional oyster sauce (1-2 tsp) as needed. Stir & enjoy!

4FA89509-9071-4962-A8E2-0B012964CFE3.jpg
IMG_2408.jpg

Creamy Broccoli/Spinach Pesto Pasta with Cherry Tomatoes

IMG_2635.jpg

Packed with tons of veggies, this pesto pasta dish definitely delivers on nutrients and taste! It’s paired with some blistered cherry tomatoes that deliver the occasional burst of sweetness, and it’s topped with a whole burrata(!), fragrant Italian olive oil, sea salt, and chili flakes! And, best of all, it’s Christmas colors (haha)! Feel free to add your own protein (like chicken or shrimp) to make it even more substantial. As this wild year comes to an end, I hope we can all dedicate some time to reflect on all our blessings & lessons we’ve learned along the way. Wishing you all a very merry Christmas with your family and loved ones!!

IMG_9966.jpg

Recipe:

  1. Prepare Pesto Sauce: Combine 5 cloves of garlic, 2 cups fresh baby spinach, 1 ½ cups broccoli florets (about 1 small head of broccoli, excluding stems), 1 ½ cup fresh basil, ½ cup grated parmesan, 1 tsp Italian seasoning, and 1/3 cup pine nuts in a food processor. Season with salt and pepper to taste. Slowly add in 1/3 – ½ cup chicken stock until the sauce is well emulsified (make sure the consistency is not too thin, so add a little at a time). Note that no olive oil is added here.

  2. Prepare Pasta: Cook your favorite pasta (I like thin spaghetti) in boiling salted water and drain (6-7 min).

  3. Prepare blistered tomatoes: On medium high heat, cook cherry tomatoes in ½ tbsp of olive oil and cook until softened and have just begin to burst (about 5 min); set aside.

  4. Transfer pasta to a large pan and stir in your pesto sauce and ½ cup heavy cream. Stir until well coated and continue to heat over medium low heat for 2-3 min.

  5. Plate and top with blistered cherry tomatoes. Add burrata, cut lengthwise, and garnish with red chili flakes, flaky sea salt, and olive oil.

IMG_2650.jpg

Smoked Salmon Pizza

IMG_2347.jpg

This is a dish that can be served as breakfast, brunch, lunch, or even a light appetizer before dinner! Super easy to assemble and looks fancy (haha). The textural & temperature contrast and classic combination of ingredients make it super delicious. I’ve seen it on the menu of many restaurants for $50+ (crazy...) but you can easily make it at home for a fraction of the price! For this pizza, I used Ikura-grade gold pearl salmon roe from @therealtsarnicoulai (sustainably caught salmon) and nicely pre-trimmed and smoked @ducktrapriverofmaine Kendall Brook® salmon.

Recipe:

  1. Pizza Crust: Combine 1 cup AP flour, 1 envelope (2¼ tsp) pizza crust yeast, 1½ tsp sugar, ½ tsp salt in a large bowl. Add ½ cup warm water (around 110-120°F) and mix well until blended. If necessary, add enough flour to make a ball of dough that is pliable. Knead on a floured surface for 3-4 min. Roll the dough into a circle (or whatever desired shape). Place on a greased baking sheet (olive oil). Brush the dough with 2 tbsp of olive oil. Sprinkle ¼ cup of thinly sliced red onion over the top of the dough. Season with salt.

  2. Bake in oven at 425°F for 15 minutes (or until crust is slightly browned). Remove from oven and let cool for 5 min.

  3. Spread 2-3 tbsp softened cream cheese (or crème fraiche) over the top of pizza.

  4. Arrange thinly sliced smoked salmon over the top. Cut pizza into 4-6 slices. Sprinkle finely chopped chives over the top. Place a small spoonful of salmon caviar on each slice (optional). Squeeze some lemon juice over the top, add lemon zest, and serve immediately!

IMG_2312.jpg
IMG_2328.jpg

Fig, Prosciutto, and Mozzarella Flatbread w/ Avocado

IMG_2164.jpg

It’s fig season again! My parents recently delivered a recent harvest of fresh black mission figs from their yard, so I thought I’d make a savory sweet flatbread/pizza! This flatbread has an addicting combination of flavors: creamy mozzarella, sweet figs, salty prosciutto, peppery arugula, creamy avocado, and tangy balsamic – all on a simple homemade pizza crust! As usual, let's all take every reasonable effort to limit & prevent the spread of COVID-19 for our friends, family, and community! Stay well all! :)

Recipe:

  1. Flatbread/Pizza Crust: Combine 1 cup AP flour, 1 envelope Fleischmann’s Pizza Crust Yeast (2 ¼ tsp), 1½ tsp sugar, ½ tsp salt in a large bowl. Add ½ cup warm water (around 110-120ºF) and mix until well blended. Gradually add enough flour to make a ball of dough that is pliable but still a little sticky. Knead the dough on a floured surface until smooth and elastic (takes about 3-4 minutes). Add more flour as necessary. Roll out the dough into desired shape and thickness. Place on a greased baking sheet (olive oil). Fold edges to form a crust (if desired). Note: there’s no need to wait for the dough to rise if using pizza crust yeast; otherwise, cover dough and let rest for 30 minutes in a warm spot.

  2. Mince 3 cloves of garlic and mix with 2 tbsp olive oil. Use a brush to coat the pizza dough, making sure to apply liberally to the crust.

  3. Cut a few thick slices of mozzarella cheese and place/distribute them evenly on top of the dough.

  4. Cut 4-5 fresh figs (washed) into ¼” slices and distribute over the dough surface. Note: If it’s not fig season, you could always substitute with 1-2 tbsp fig jam.  

  5. Preheat oven to 425ºF. Bake on the lowest rack for 15-18 minutes (or until crust is browned and cheese is slightly browned & bubbly). Remove from oven and let cool for about 5 minutes.

  6. Immediately before serving, sprinkle arugula over the top and add a few slices of prosciutto and freshly sliced avocado.

  7. Garnish with sea salt flakes, balsamic vinegar, and olive oil. Add quartered figs if you want additional texture.

IMG_2195.jpg

Singaporean Curry Laksa w/ Chicken and Prawn

IMG_2275.jpg

Oh how I miss Singapore and all the delicious multicultural food you can find at its restaurants & hawker centers! My Singaporean favorites are chili crab, curry laksa, and anything with the word “satay” in it – not to mention all the amazing desserts. Haha. I seriously can’t wait until the world opens up again and we’re all able to travel freely! If you’ve never heard of laksa, it’s a fragrant spicy coconut curry-based soup that is often enjoyed with egg or rice noodles and a variety of other ingredients (fish cake, chicken shrimp, clams, bean sprouts, etc.). Fried bean curd/tofu is my favorite ingredient, because it soaks up all those delicious flavors like a sponge! It’s such a unique flavor profile and one that I definitely suggest trying!

Recipe:

  1. Ingredient Prep: You can basically cook everything beforehand and have it ready to assemble: a) Blanch bean sprouts in boiling water for 1 min. b) Cook shrimp (peeled, de-veined) for about 2-3 minutes in boiling water, drop in ice cold water (to stop the cooking process), and drain. c) Cook fish cake (sliced)/fish balls for 1 min. d) Cook boneless/skinless chicken thighs in boiling water for approx. 10 min. Drain and slice. E) Cook your preferred egg noodles or vermicelli according to instructions (1-2 min if using pre-cooked packages).  

  2. Soup/Gravy Base: Some ingredients for laksa are a little harder to source in the US, so I chose to use my favorite laksa package by @primataste , which you can find at most Asian supermarkets (eg. H Mart, 99 Ranch). Just follow their instructions by adding their laksa premix into 2 ½ cups of water, add their laksa paste (with laksa leaves), stir, and bring to a boil. Add in your fried bean curds and simmer for an additional 5 minutes.   

  3. Assembly: In a bowl, assemble all your dry ingredients. Then ladle on your rich Laksa gravy over the top, garnish with lime and sambal chili, and enjoy immediately!

IMG_2200.jpg
IMG_2201.jpg
IMG_2279.jpg

Levain-style Chocolate Chip Walnut Cookies

These whopping huge cookies are known for their incredible size, flavor, crispy exterior, and gooey center! I've loved these ever since a friend brought them back from NY, and now I can have them anytime I want! #dontforgettobrush 😜

IMG_2116.jpg

Recipe:

  1. Preheat oven to 400ºF.

  2. Using a hand/stand mixer, cream together 1 cup unsalted butter (cold, cut into small cubes), 1 cup brown sugar, and ½ cup white sugar. Once the mixture is well-mixed and fluffy, add in 2 eggs and continue mixing until well incorporated.

  3. To the bowl, add in 1½ cup all-purpose flour, 1½ cup cake flour, ¾ tsp baking soda, 1 tsp cornstarch, and ½ tsp salt. Then, stir in 2 cups of chopped walnuts and 12 oz chocolate chips ( 1 bag).

  4. Set aside to chill for 10-15 minutes.

  5. Form large size balls of dough (recipe should make ‪around 8-10‬). Place 4 balls of portioned dough on a non-stick baking sheet or baking sheet lined with parchment paper/silicone mat.

  6. Bake for 12-15 minutes. I like to check the bottom of one cookie after 10 min to see how far along it has baked and check for browning. You can adjust baking time accordingly (since there’s a lot of variation in calibrated oven temperatures).

  7. Once ready, remove from baking sheet and allow cookies to rest for 15 minutes to firm up. Repeat baking process for the remaining dough. Enjoy!

Levain-style Chocolate Peanut Butter Walnut Cookies

IMG_2156.jpg

As a dentist, I probably shouldn’t promote sweets so much, but everything in moderation, right? Haha 😜. If you love peanut butter, definitely try this recipe! (If you don’t, you can always substitute the peanut butter chips with milk, semi-sweet, or dark chocolate chips). These cookies are super rich in flavor from the cocoa & peanut butter, have a great texture from the walnuts, and are not overly sweet! They're ginormous cookies with crispy exteriors and chewy decadent centers. Don't forget to brush and floss! As always, stay well!!

IMG_2125.jpg

Recipe:

  1. Preheat oven to 400ºF.

  2. Using a hand/stand mixer, cream together 1 cup unsalted butter (cold, cut into small cubes), 1 cup brown sugar, and ½ cup white sugar. Once the mixture is well-mixed and fluffy, add in 2 eggs and continue mixing until well incorporated.

  3. To the bowl, add in ½ cup high quality dark baking cocoa, 1½ cup all-purpose flour, 1 cup cake flour, ¾ tsp baking soda, 1 tsp cornstarch, and ½ tsp salt. Then, stir in 1½ cup peanut butter chips (about 1 10-oz bag), and 1 cup chopped walnuts.

  4. Set aside to chill for 10-15 minutes.

  5. Form large size balls of dough (recipe should make ‪around 8-10‬). Place 4 balls of portioned dough on a non-stick baking sheet or baking sheet lined with parchment paper/silicone mat.

  6. Bake for 12-15 minutes. I like to check the bottom of one cookie after 10 min to see how far along it has baked and check for browning. You can adjust baking time accordingly (since there’s a lot of variation in calibrated oven temperatures).

  7. Once ready, remove from baking sheet and allow cookies to rest for 15 minutes to firm up. Repeat baking process for the remaining dough. Enjoy!